Using Ableton Push 3 with a Focusrite Scarlett 18i20 ADAT Interface to expand inputs and outputs
Posted on September 27th, 20239/27/23
Prior to purchasing an Ableton Push 3 (standalone), I started gigging with an audio interface connected to my Mac laptop and an Ableton Push 2 midi controller. Using the interface similar to a mixer, I’d also route a dub siren and various cassette tape players through delay and loop pedals into separate channels on the interface, and mixed those signals into the DAW session. Then, I’d send out two individual MONO channels of vocals with FX and a separate STEREO mix from my DAW (without vocals) to the venue sound system. I’d also routed a custom headphone mix, that combined the individual vocal channels and the stereo DAW signal, with an EQ curve applied to boost frequencies to compensate for my particular hearing profile.
After I spent a few weeks learning how to use the new features in the Push 3, I was determined to develop a similar routing scenario so I can gig with the new Push, an audio interface and a small road case filled with my dub siren, tape players, Volca Kick, etc. It took me weeks to figure it out, as these features are not well documented (yet). With some help from Ableton Support, Focusrite Support and the kind folks on the Elektronauts.com forum, this is how I was able to make this all work.
Here are two Ableton-produced videos demonstrating how to configure the Push 3 audio and ADAT settings.
Setup the Push 3 to clock ADAT internally
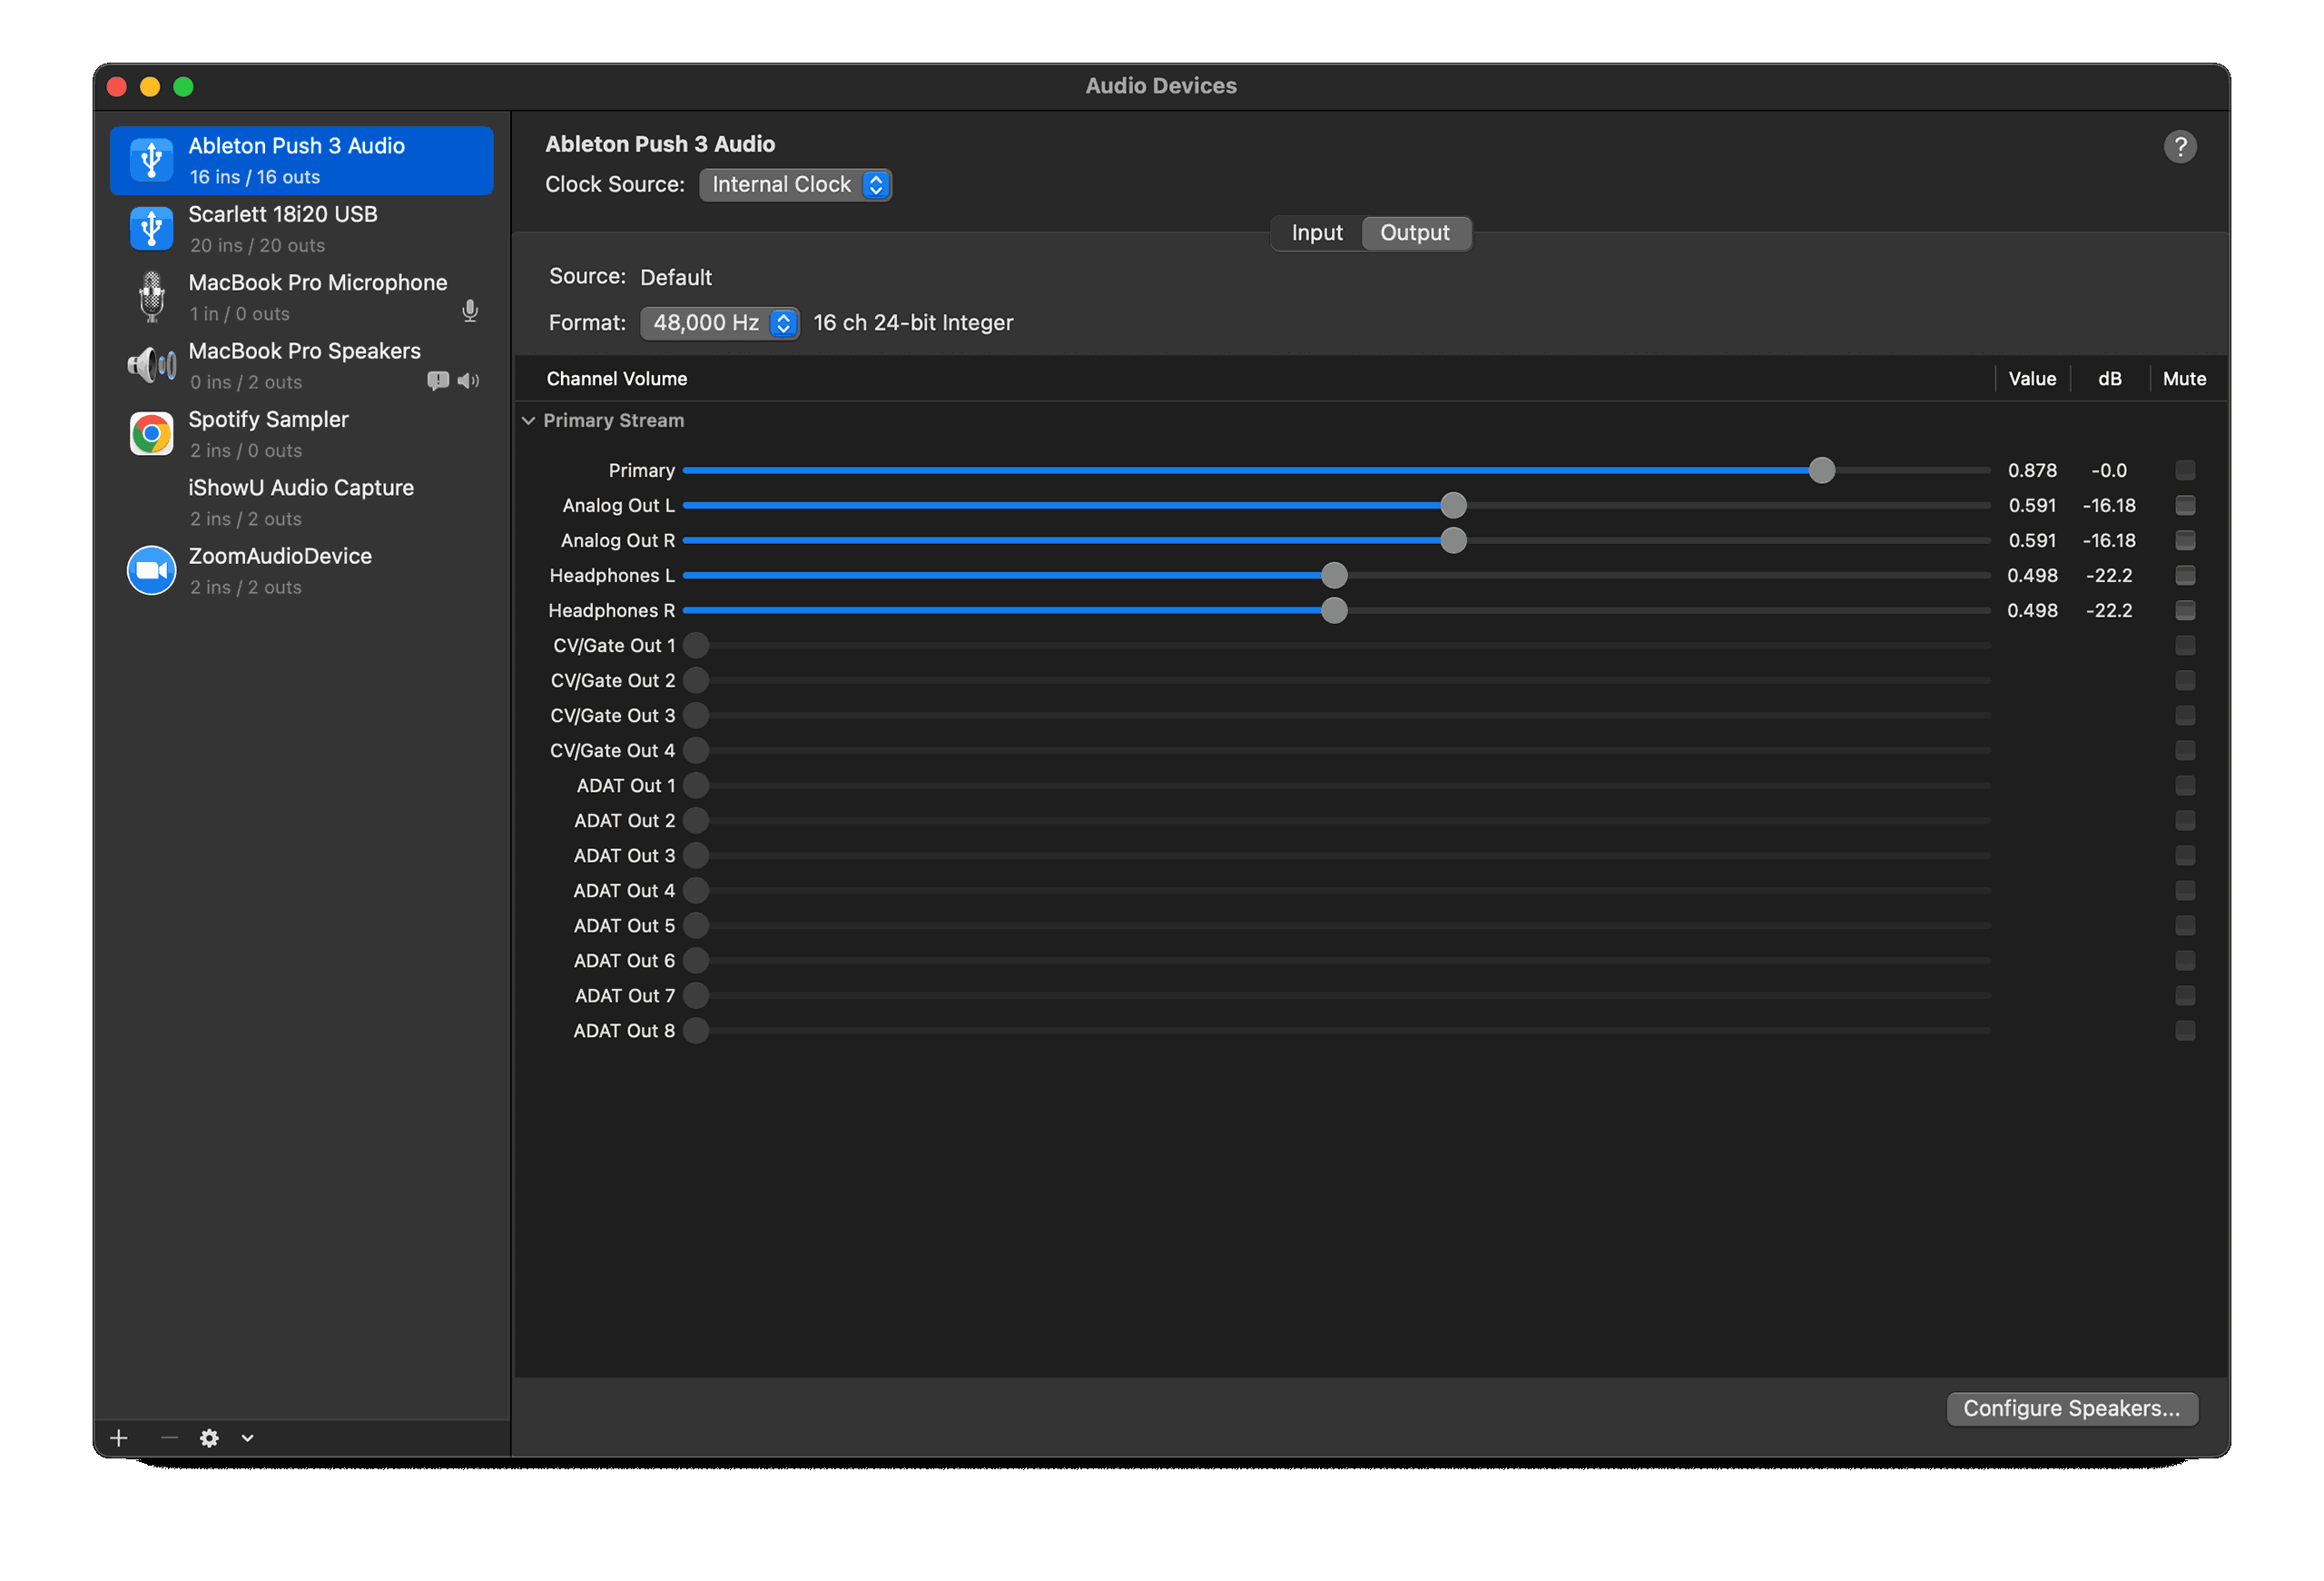
First, make sure that your Push 3 device is set to clock ADAT source as internal. On a Mac and with Push 3 connected in controller mode, use the Audio Midi Setup to check that it is setup correctly. This is important. For the ADAT expansion to work correctly, Push 3 clock sync must be set to “internal” and Focusrite Scarlett 18i20 must be set to ADAT clock sync.
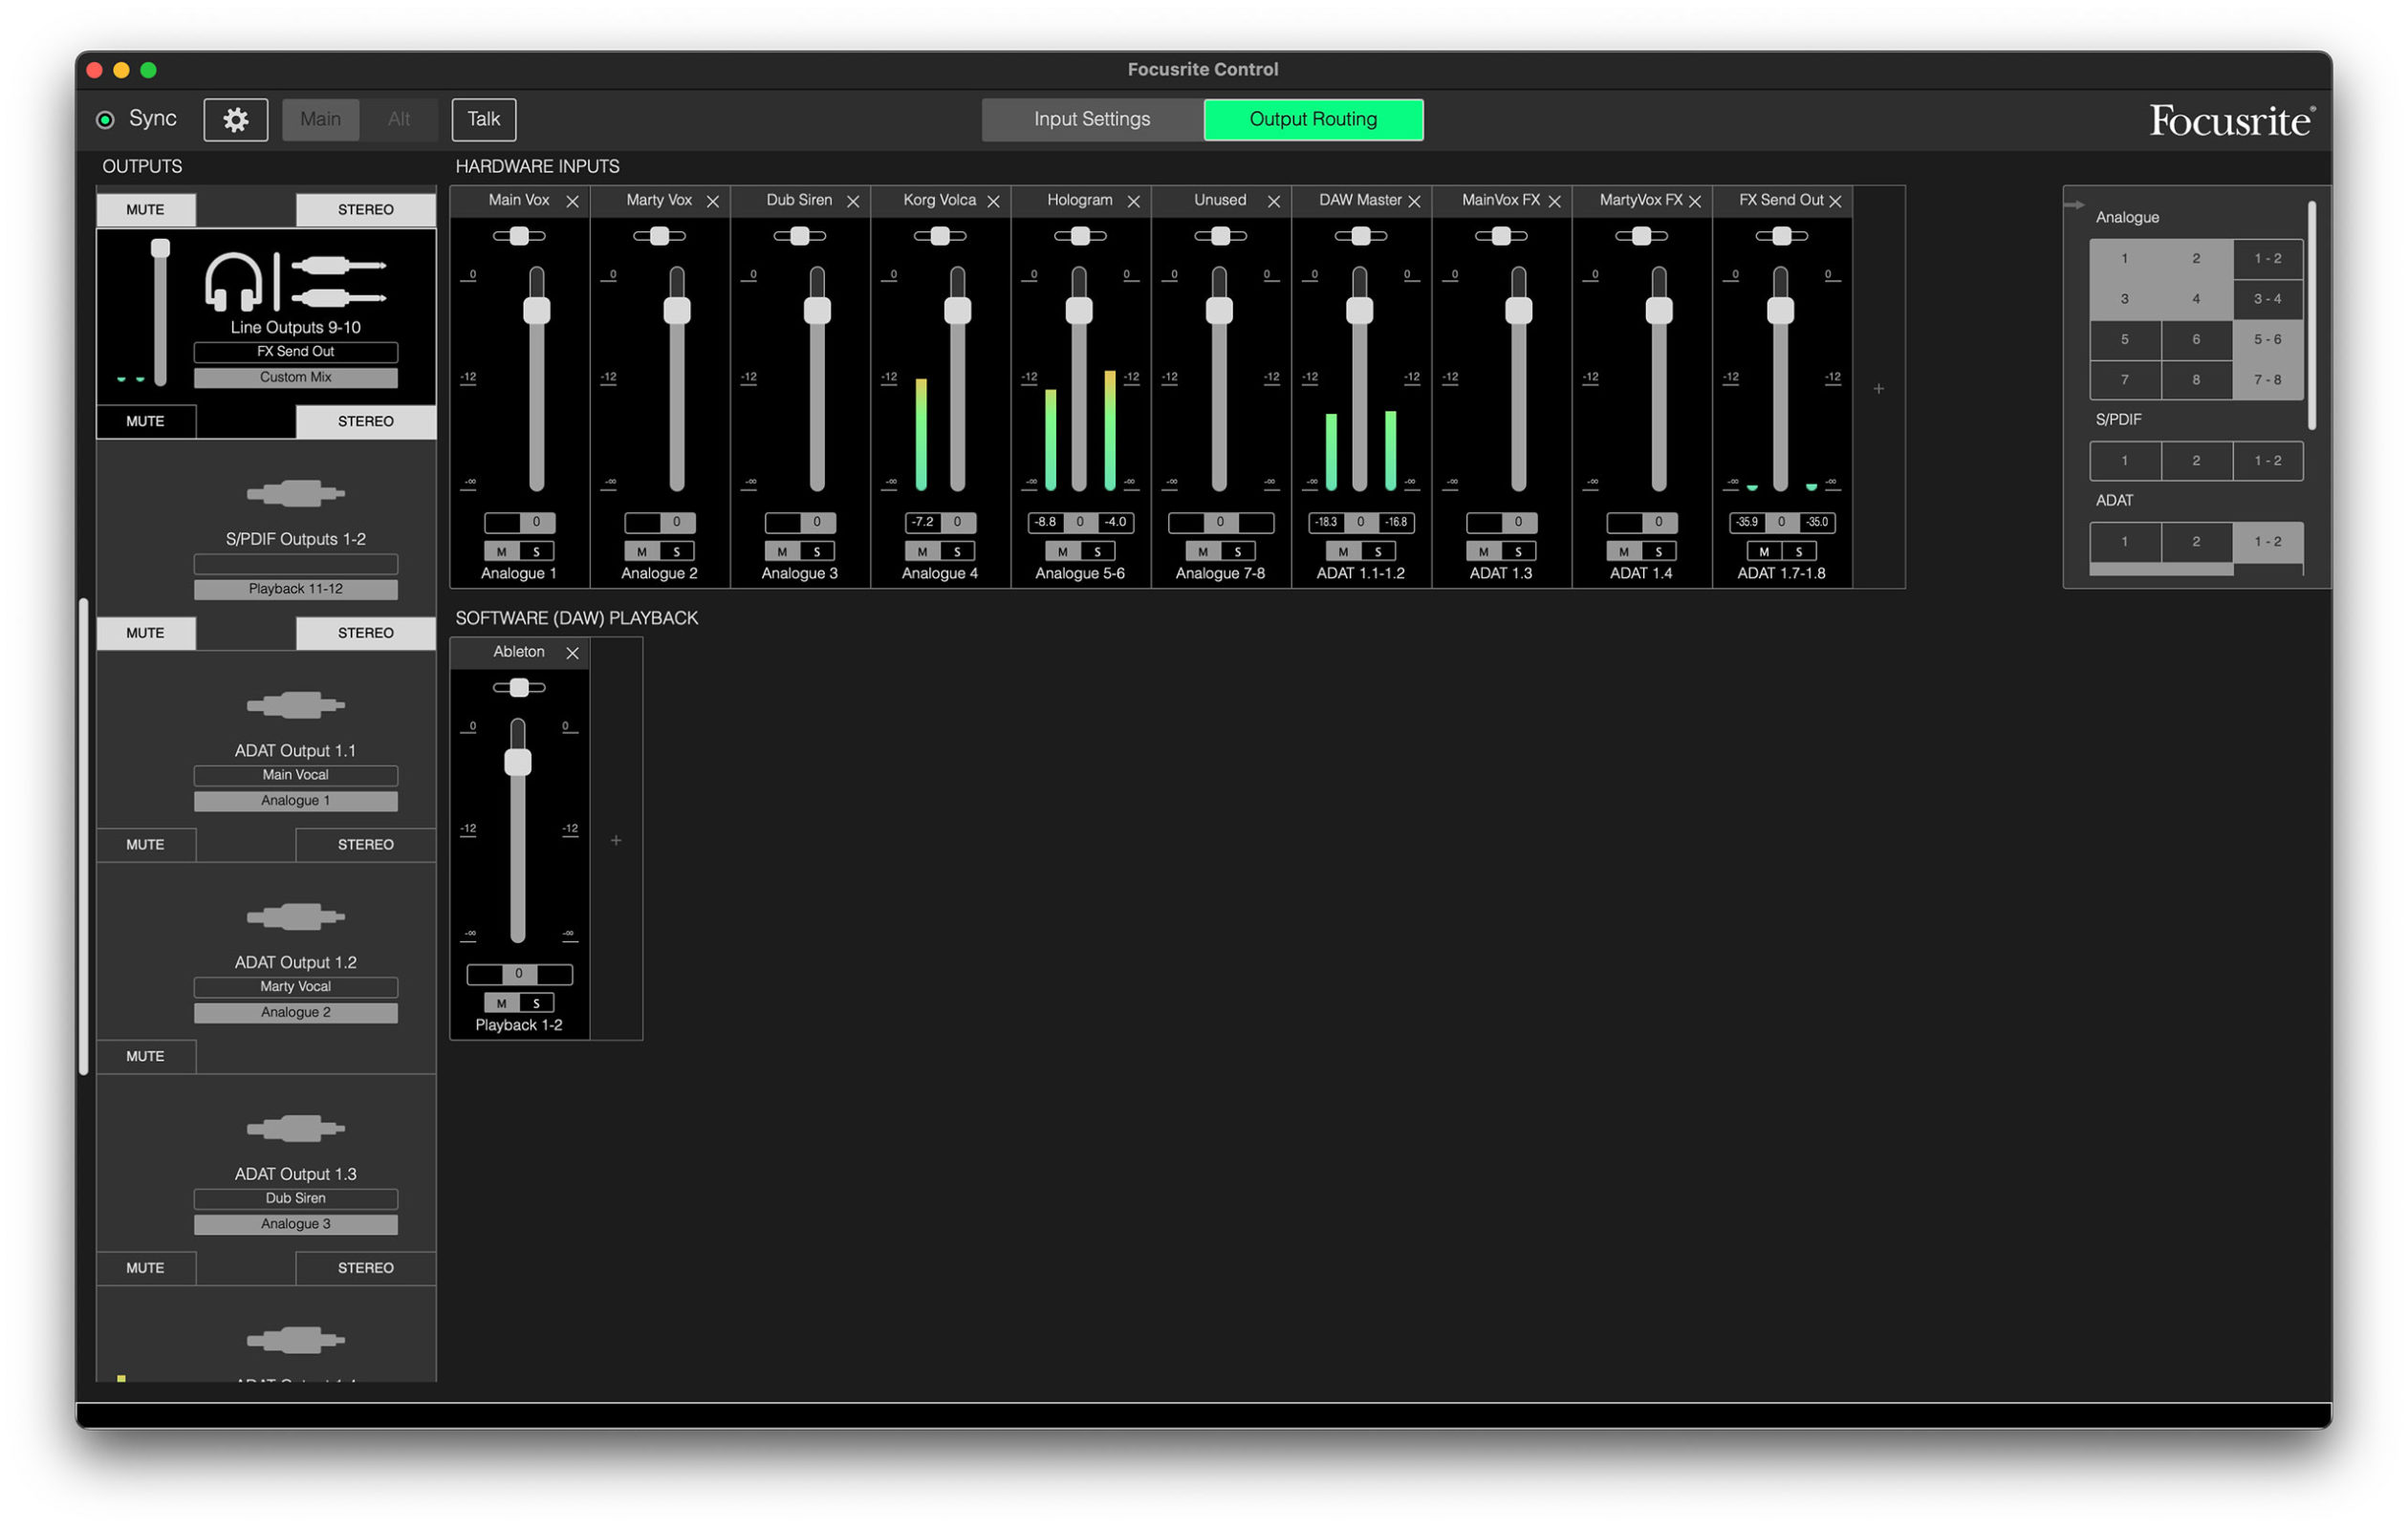
Configure your Focusrite Control software preferences
Before you get started, make sure you’re using the latest version of the Focusrite 18i20 firmware. You’ll also want to make sure to match the sample rate used in your Push 3 Audio settings. Here are my settings:
Sample Rate: 48khz Clock Source: ADAT Digital I/O Mode: S/PDIF RCA (this setting is important. Focusrite Support told me that no other mode is supported with Ableton Push 3
Sending Signals via ADAT from Push 3 to Scarlett 18i20 Outputs
You can send signals via ADAT from Push 3 to the Line Outputs and Headphone Outputs on the Scarlett 18i20 (3rd Gen). Push 3 will recognize the ADAT I/O of the Scarlett, but, Push 3 will not automatically recognize the Line Outputs and Headphone Outputs. Those need to be configured manually.
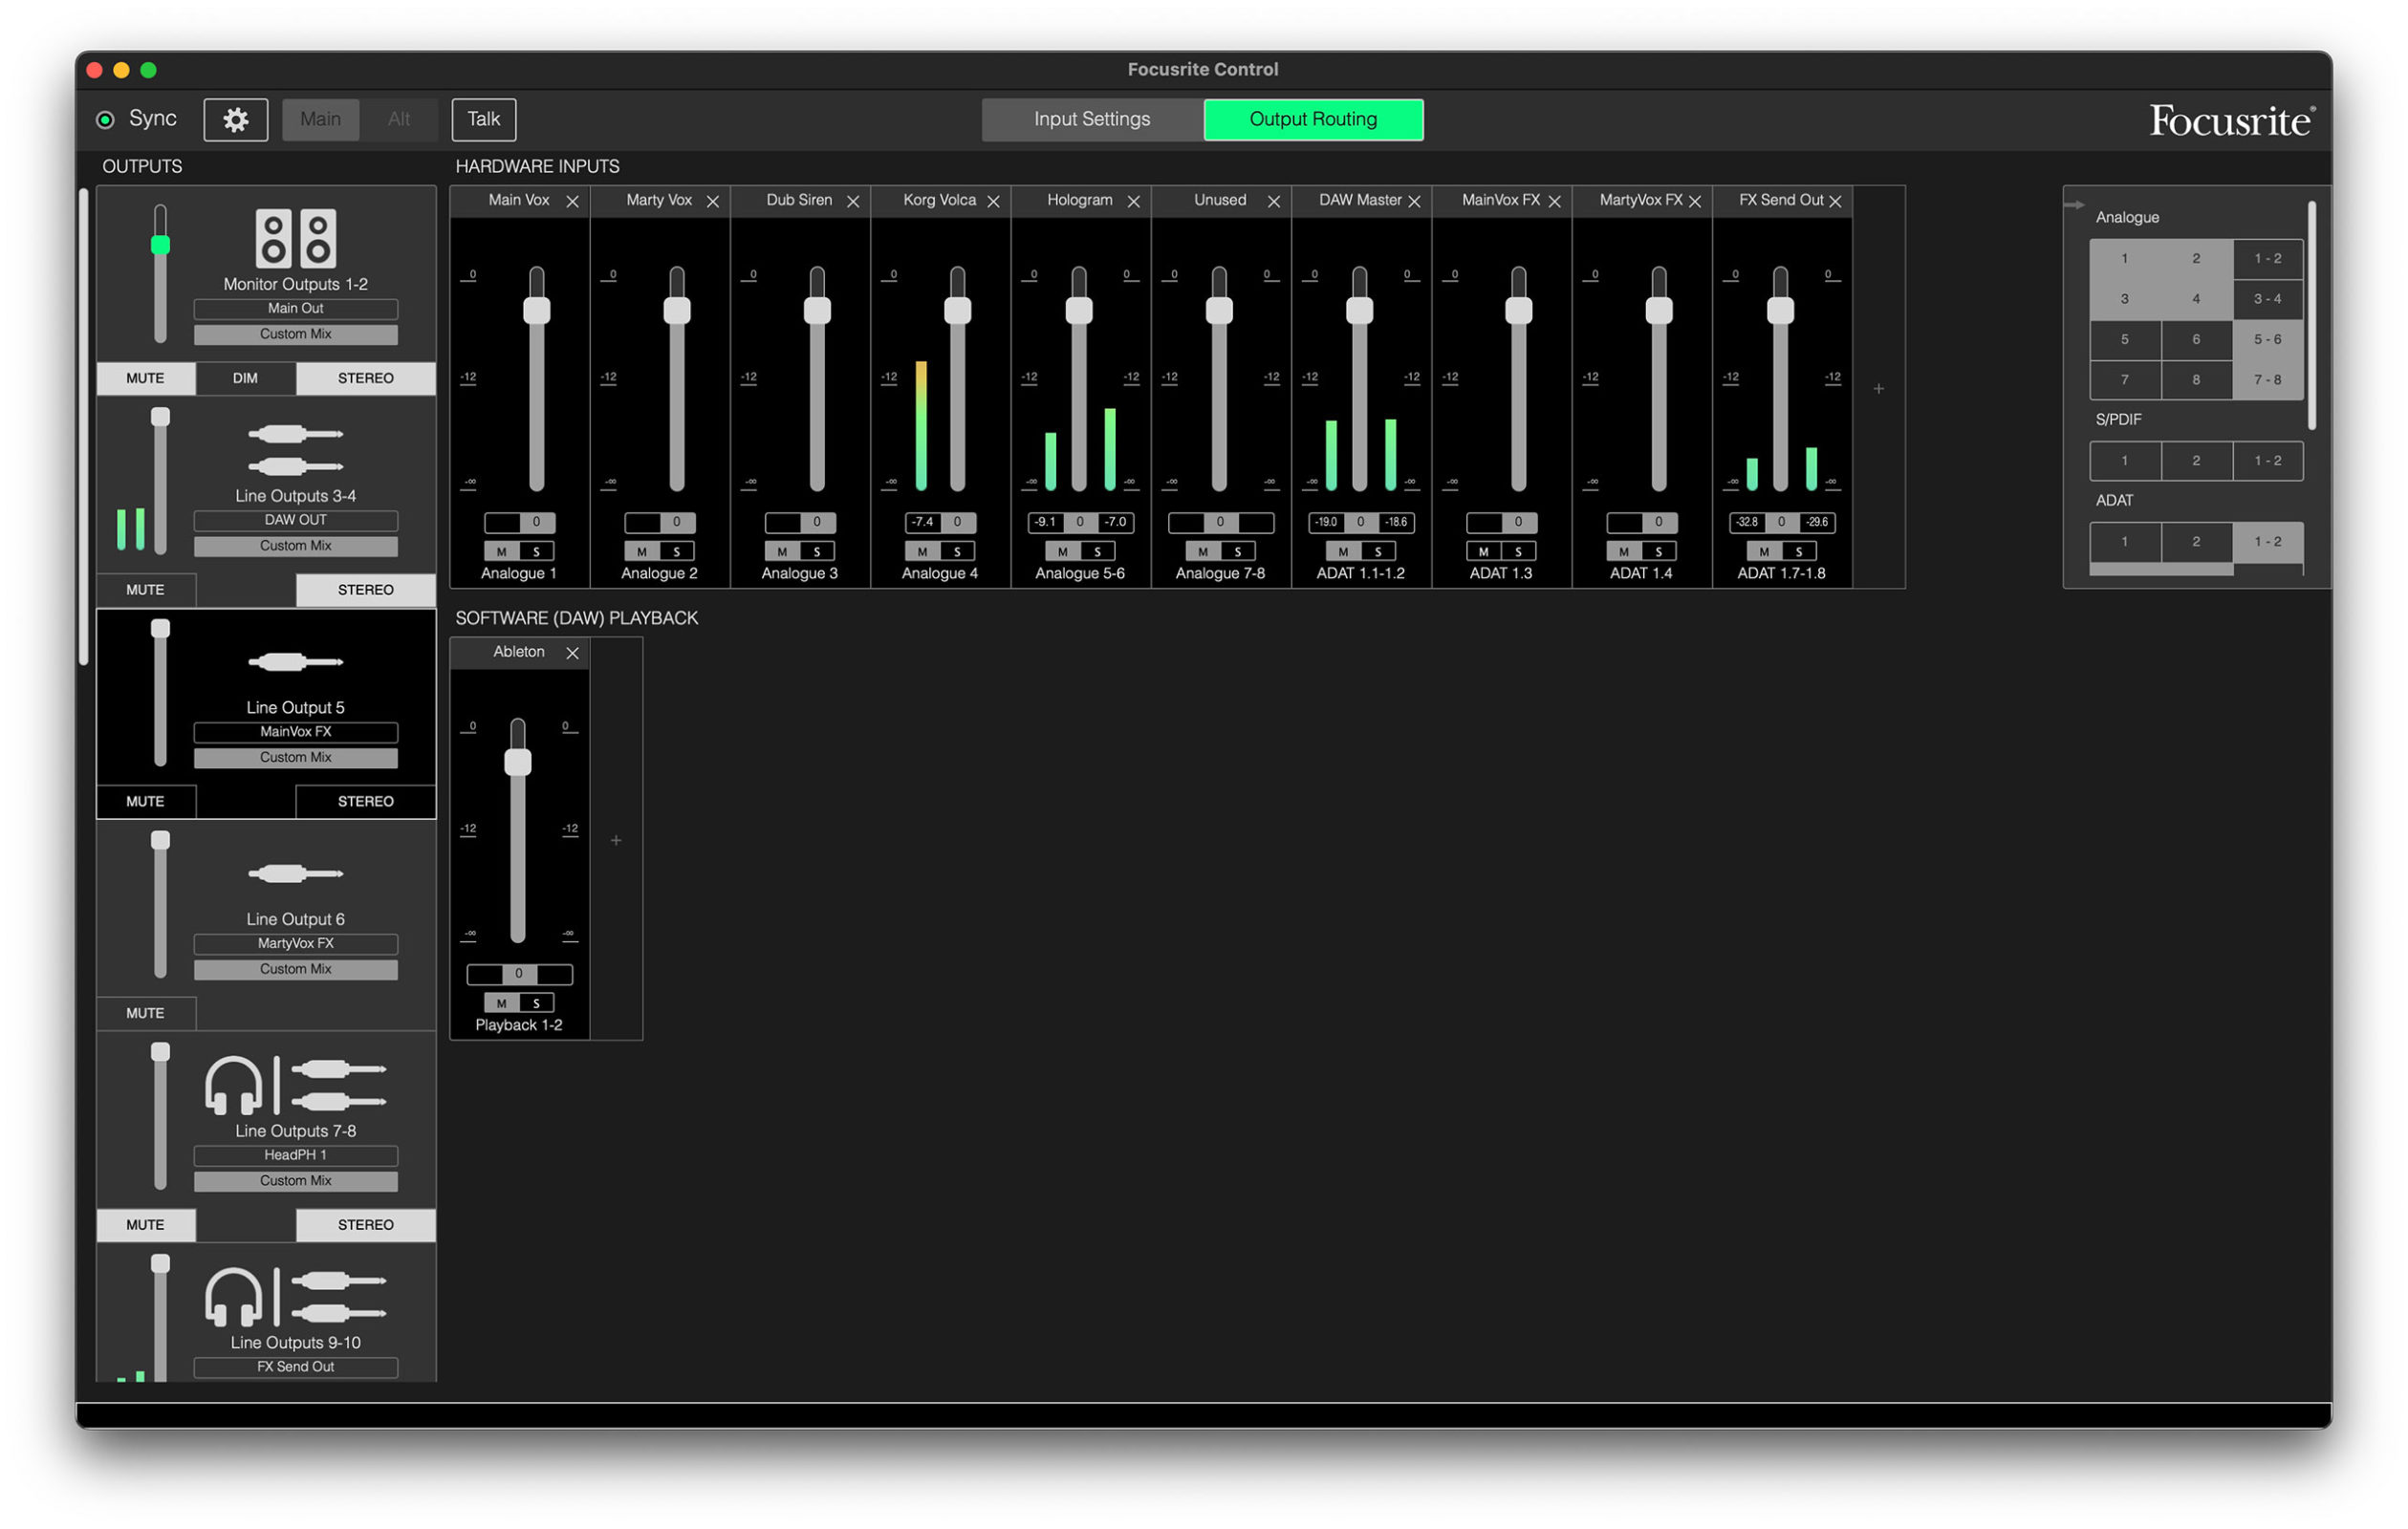
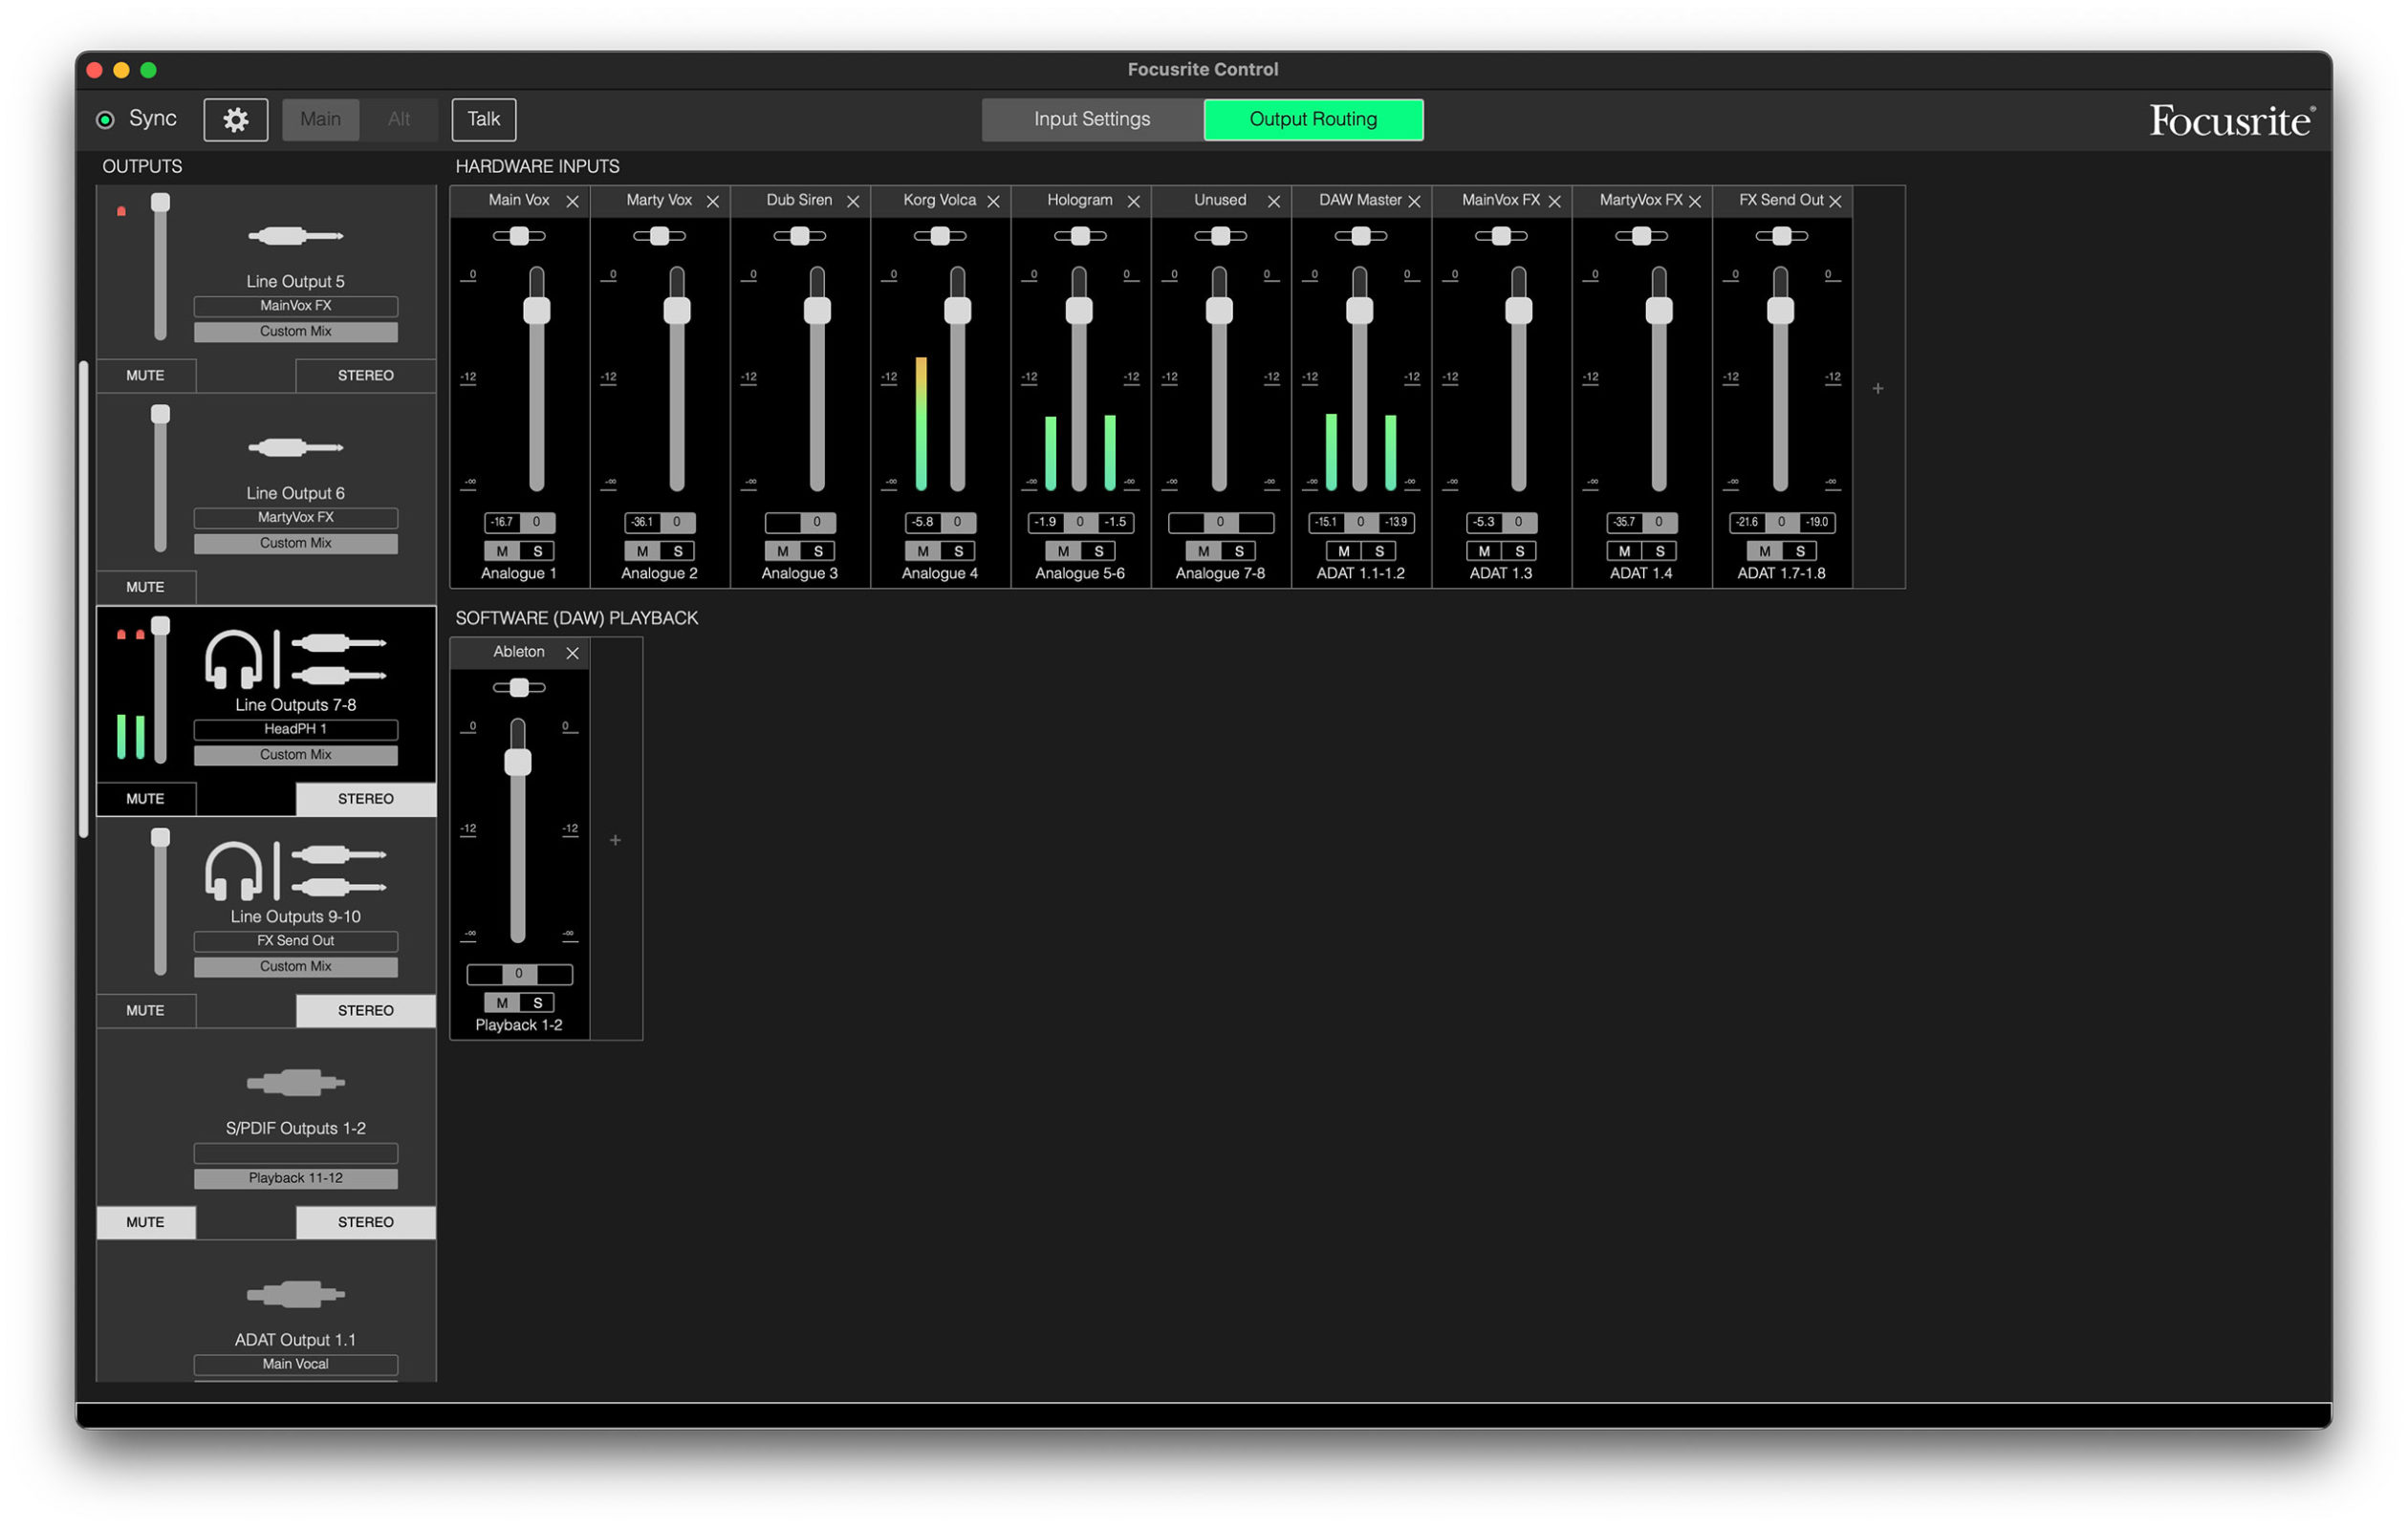
To route the signals from Push to the Line Outputs and Headphone Outputs on the Scarlett, you’ll need to custom configure the Focusrite Control application. This software allows you to configure the routing of audio signals, making it possible to send audio from Push to the desired outputs of your audio interface.
I found out the hard way, that ADAT routing can be quite complex. Here’s a rundown on how Push 3 and the Scarlett 18i20 work together.
How Ableton Push 3 handles its I/O
The configuration of the 10 Inputs and 16 Outputs on Push is as follows:
Inputs:
Inputs 1-2: Line Inputs
Inputs 3-8:Not available
Inputs 9-16: ADAT Inputs (requires an ADAT-equipped external device)
It is worth noting that Inputs 3-8 are physically unavailable on Push. The sequence of inputs jumps from 1-2 to 9-16, resulting in a total of 10 Inputs rather than 16.
Outputs:
Outputs 1-2: Main Out
Outputs 3-4: Headphone Out (Cue)
Outputs 5-6: Pedal / CV1
Outputs 7-8: Pedal / CV2
Outputs 9-16: ADAT Outputs (requires an ADAT-equipped external device)
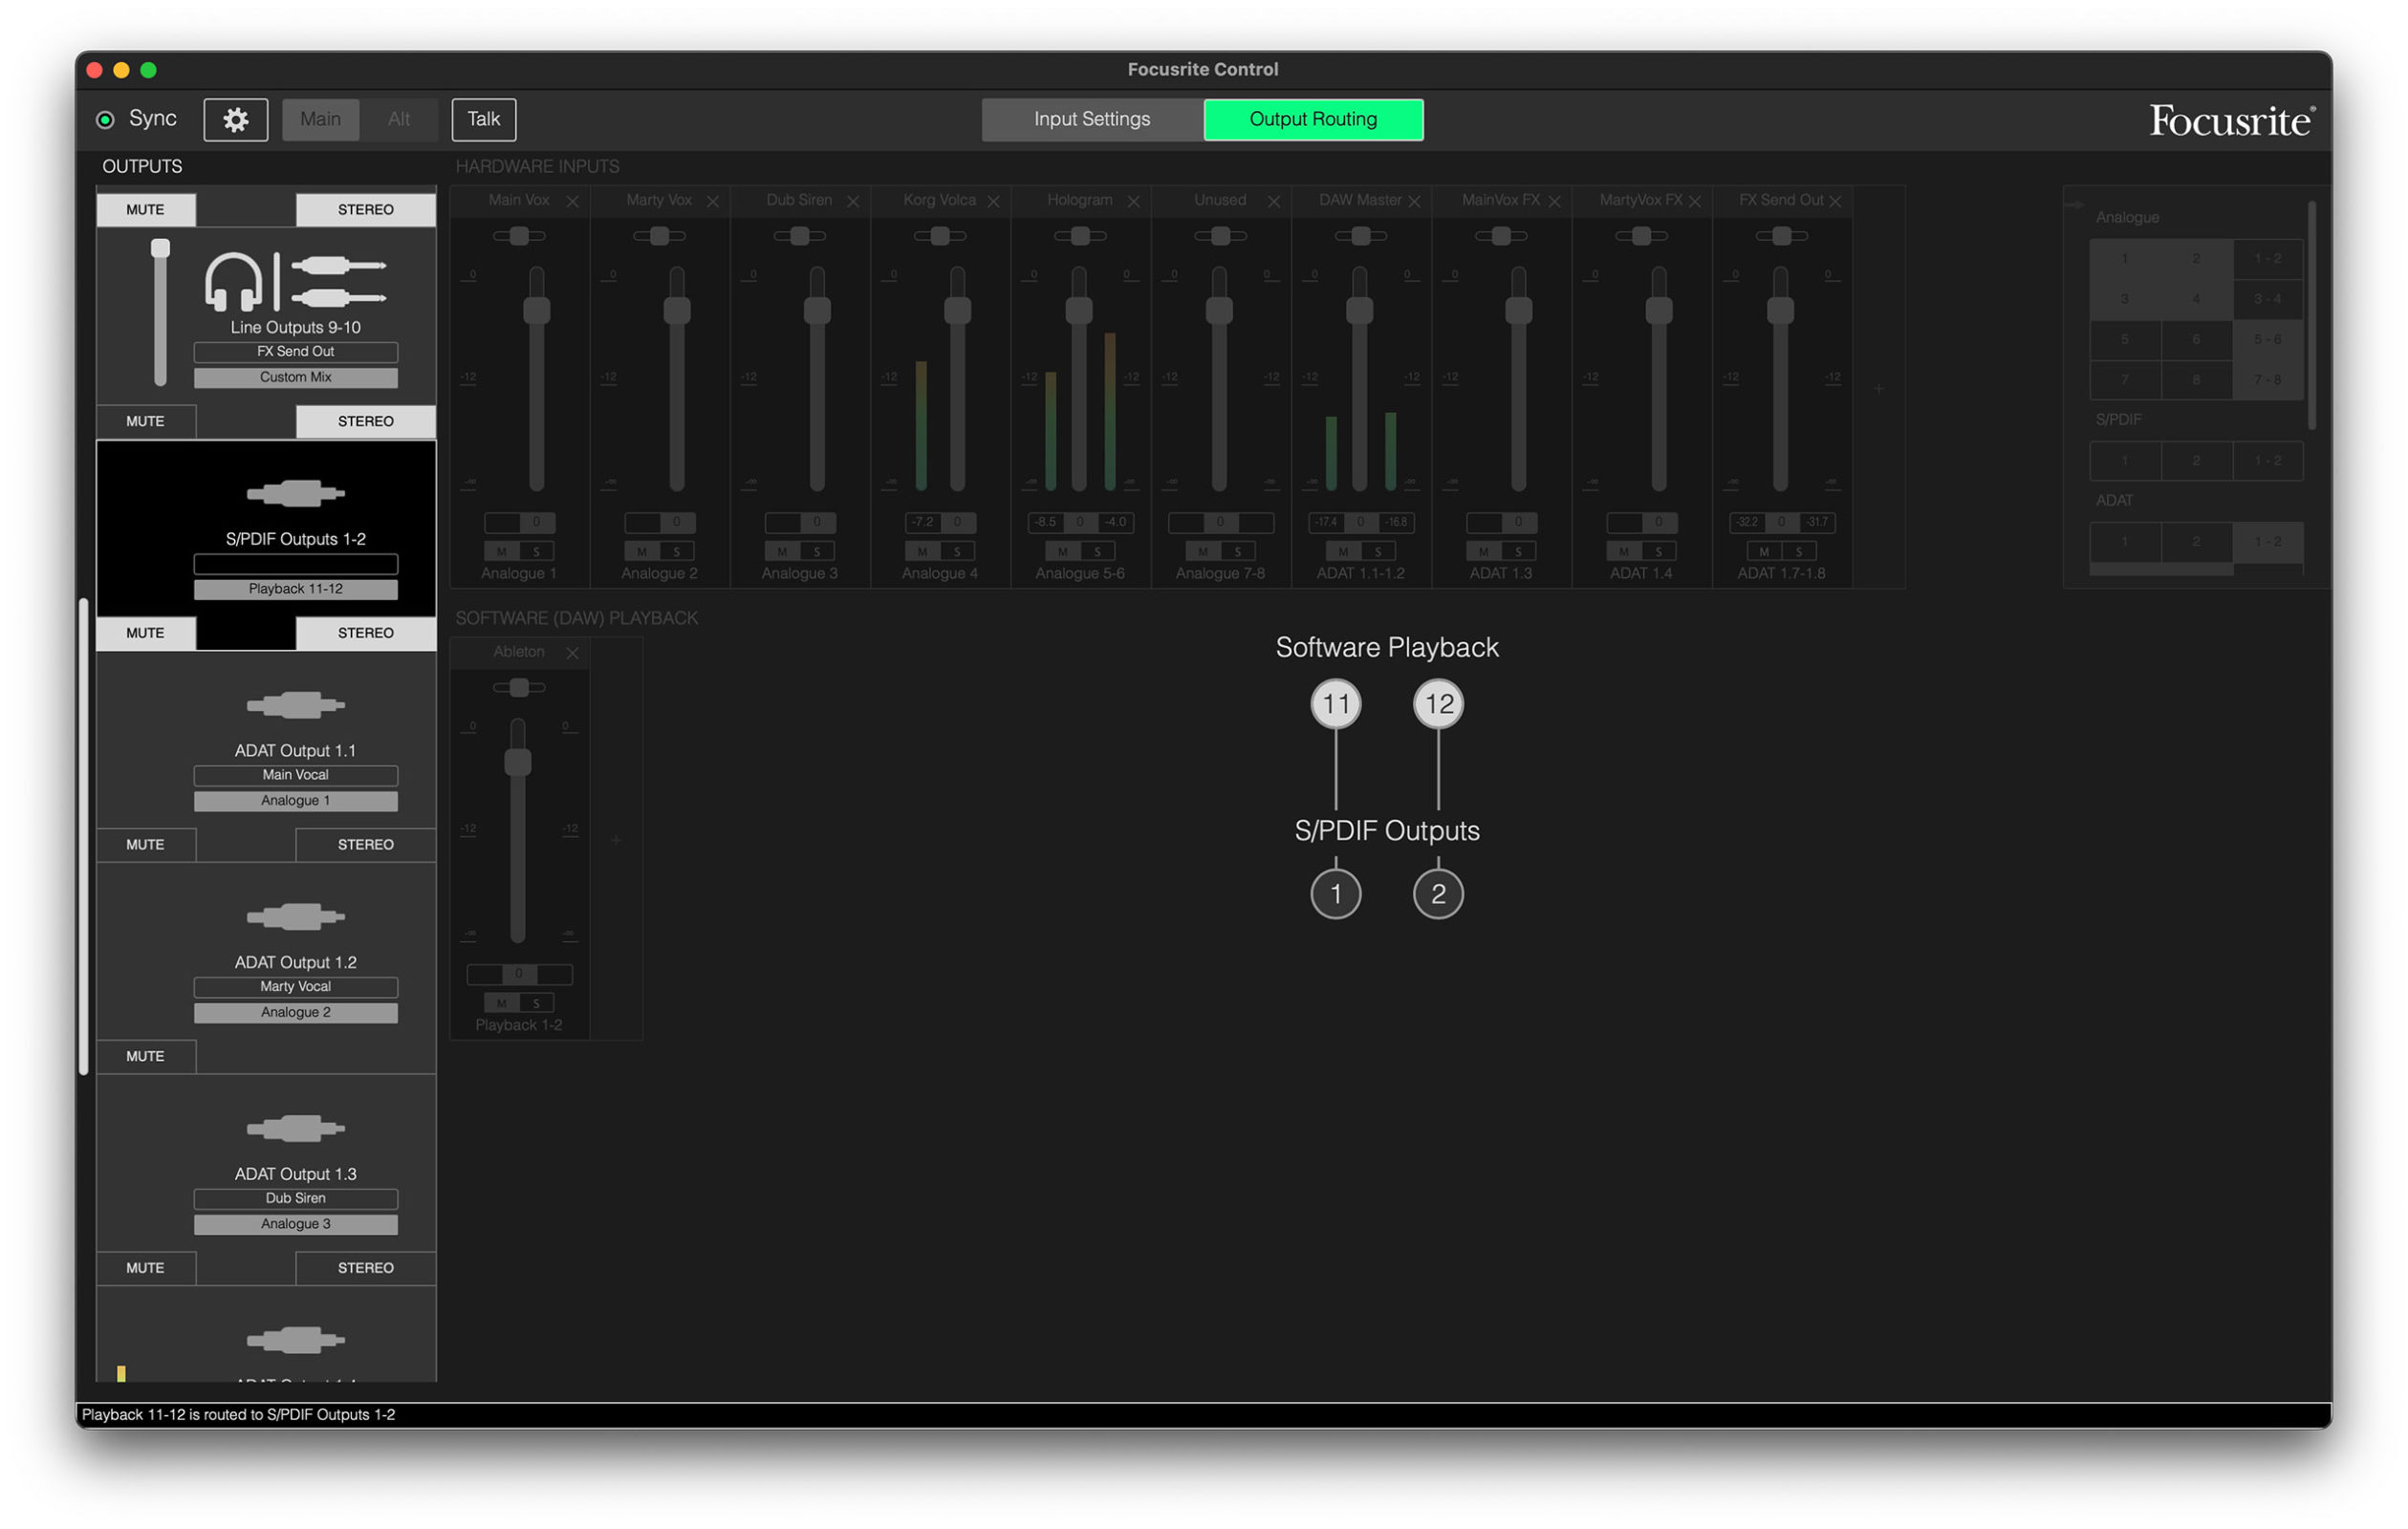
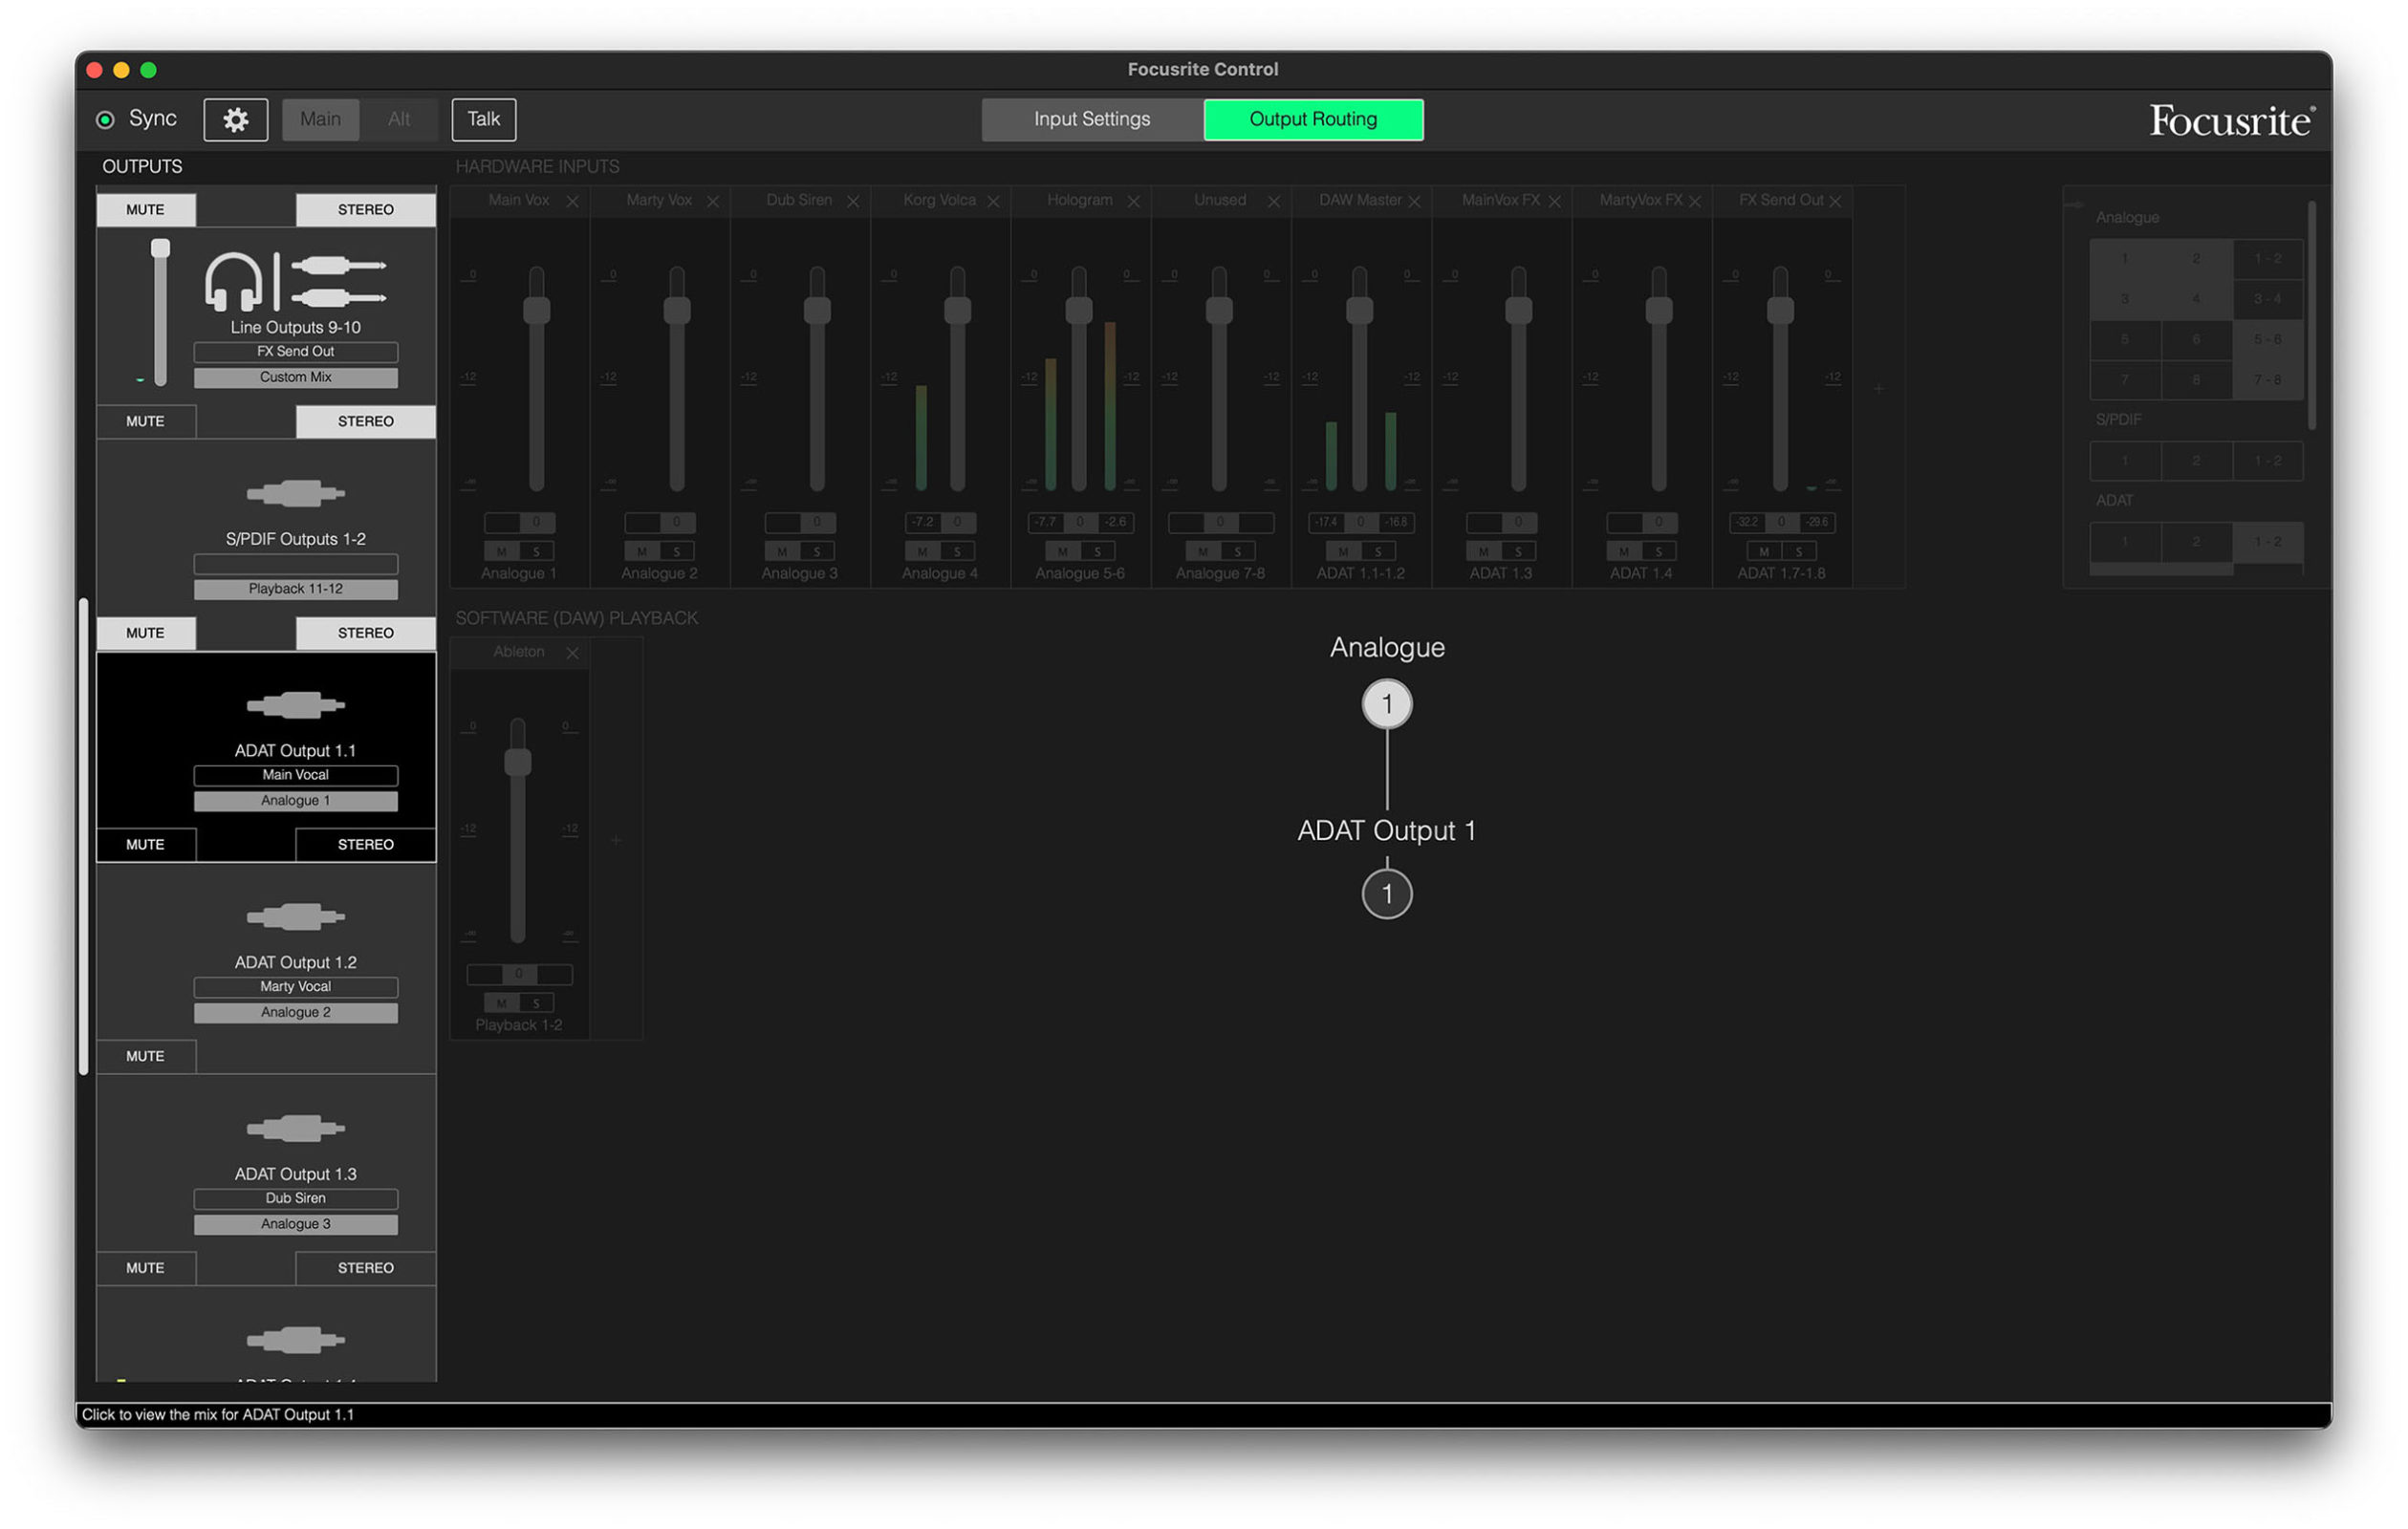
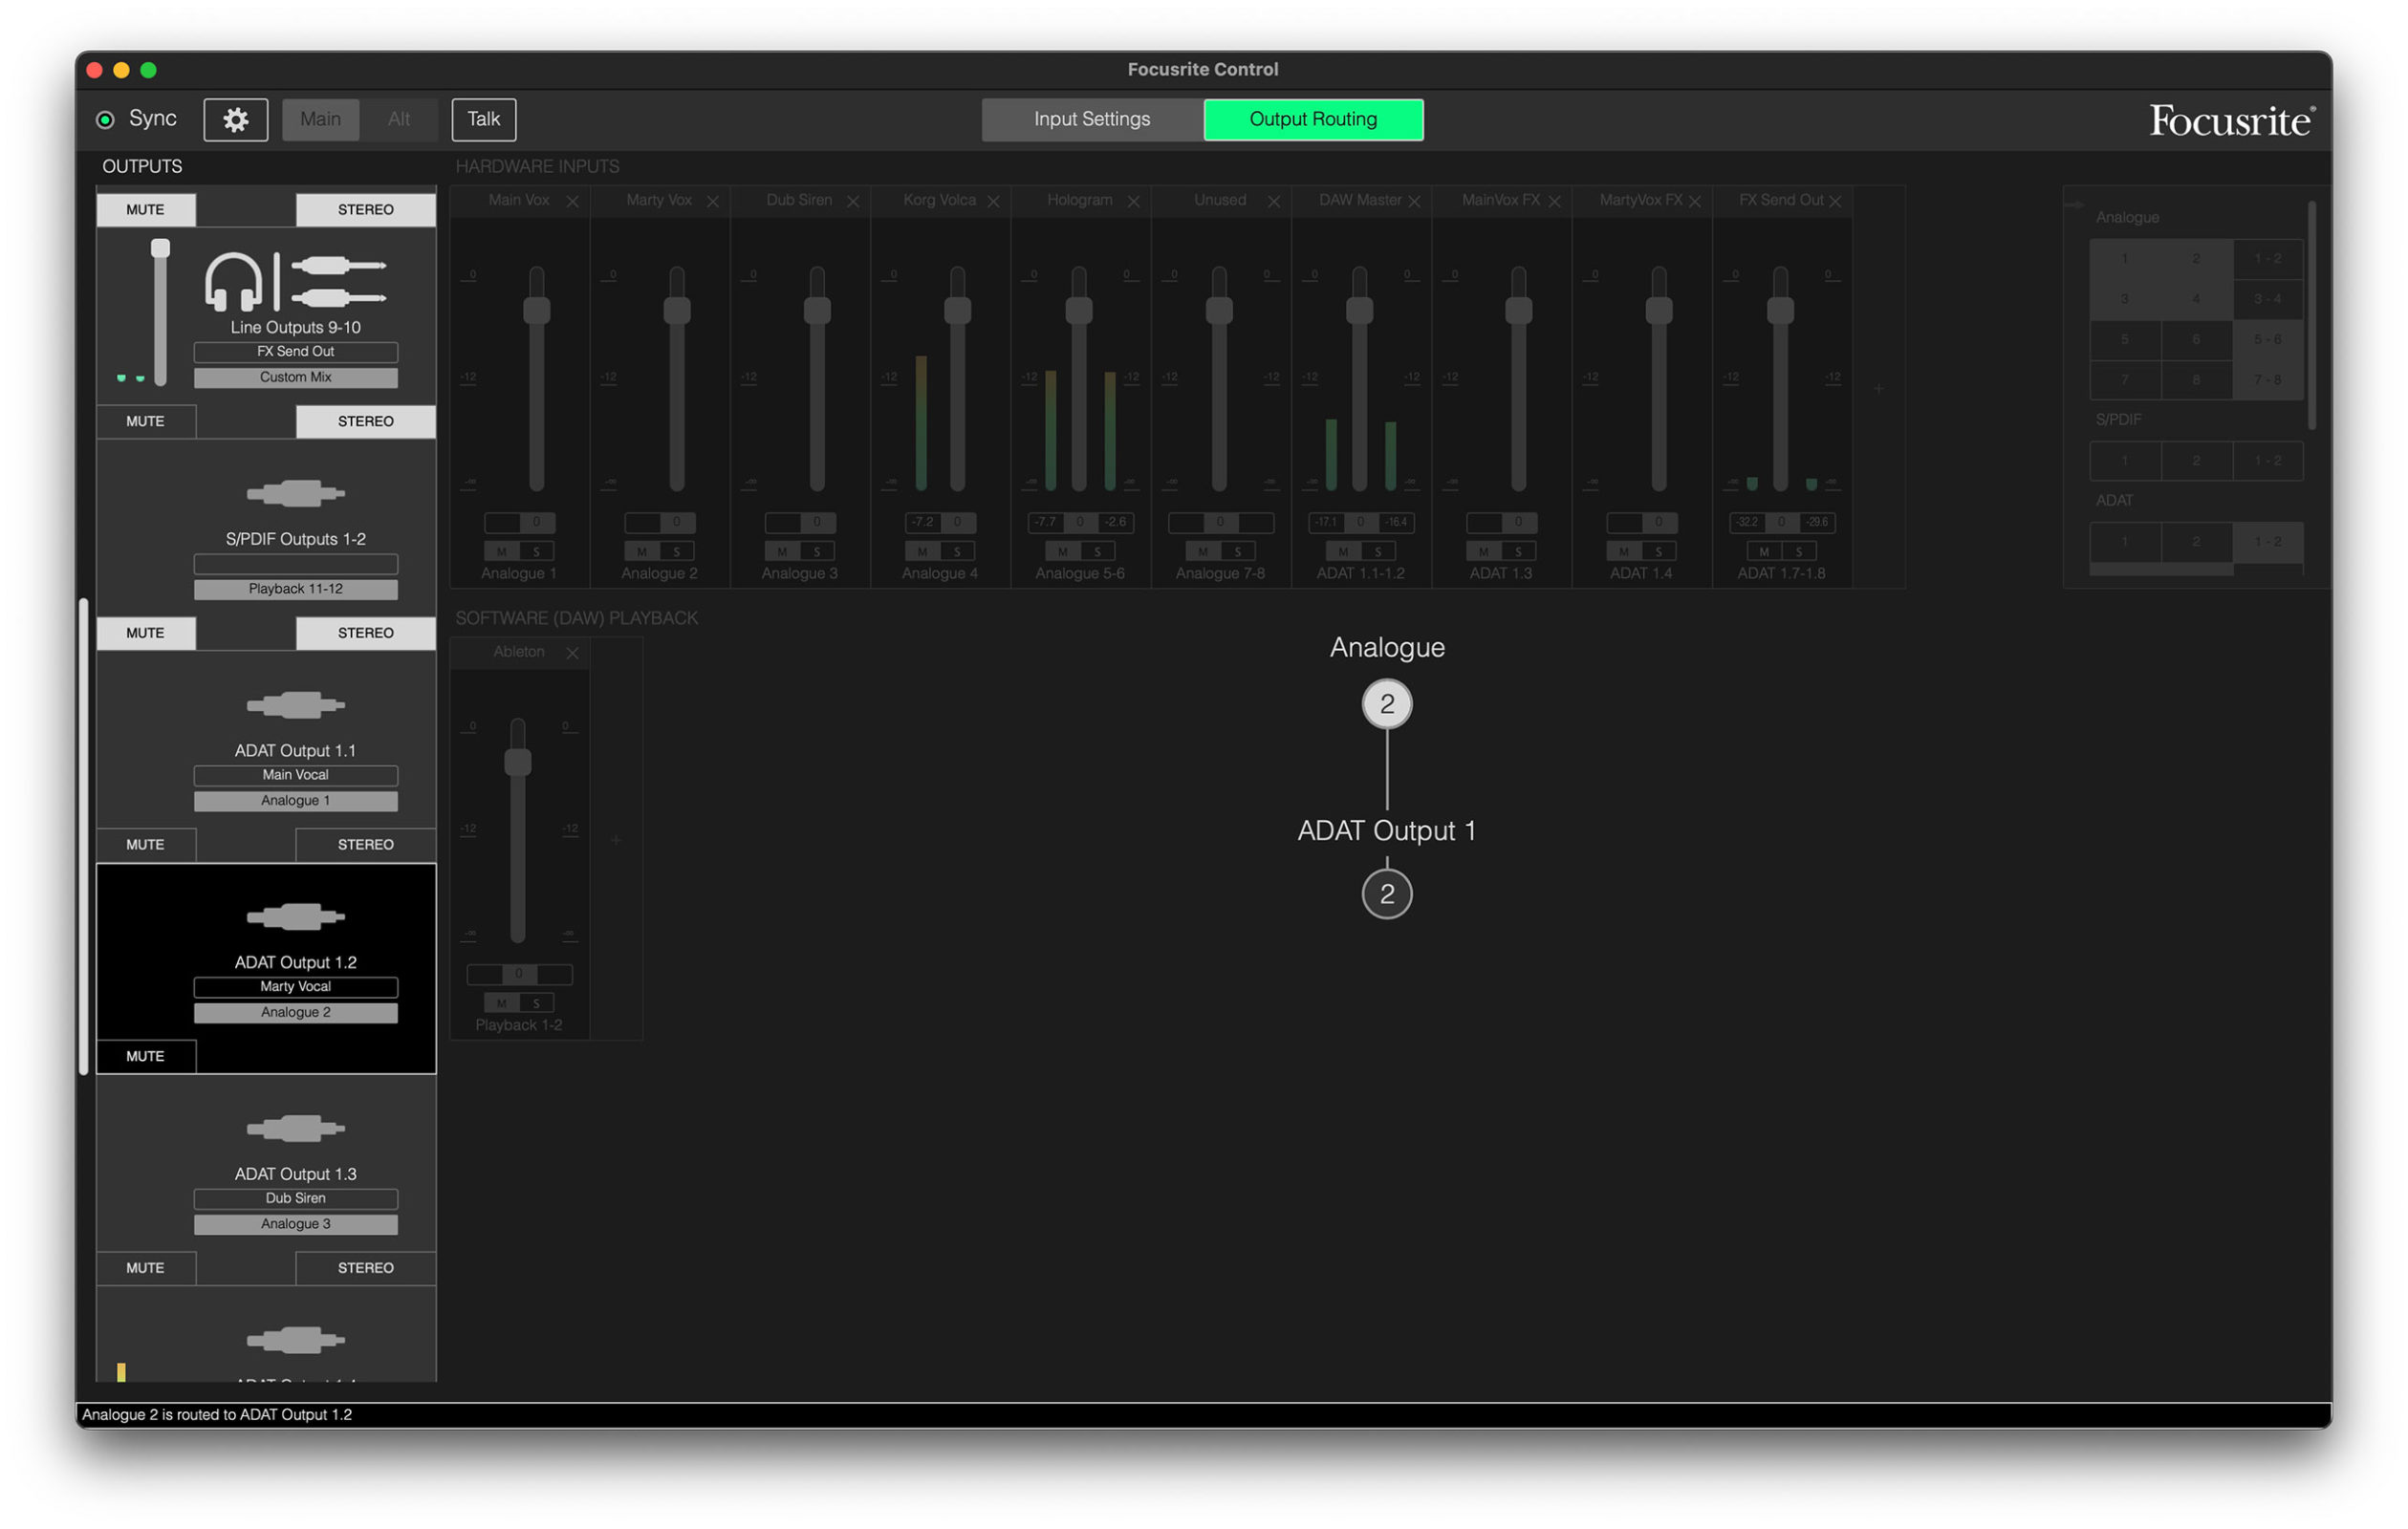
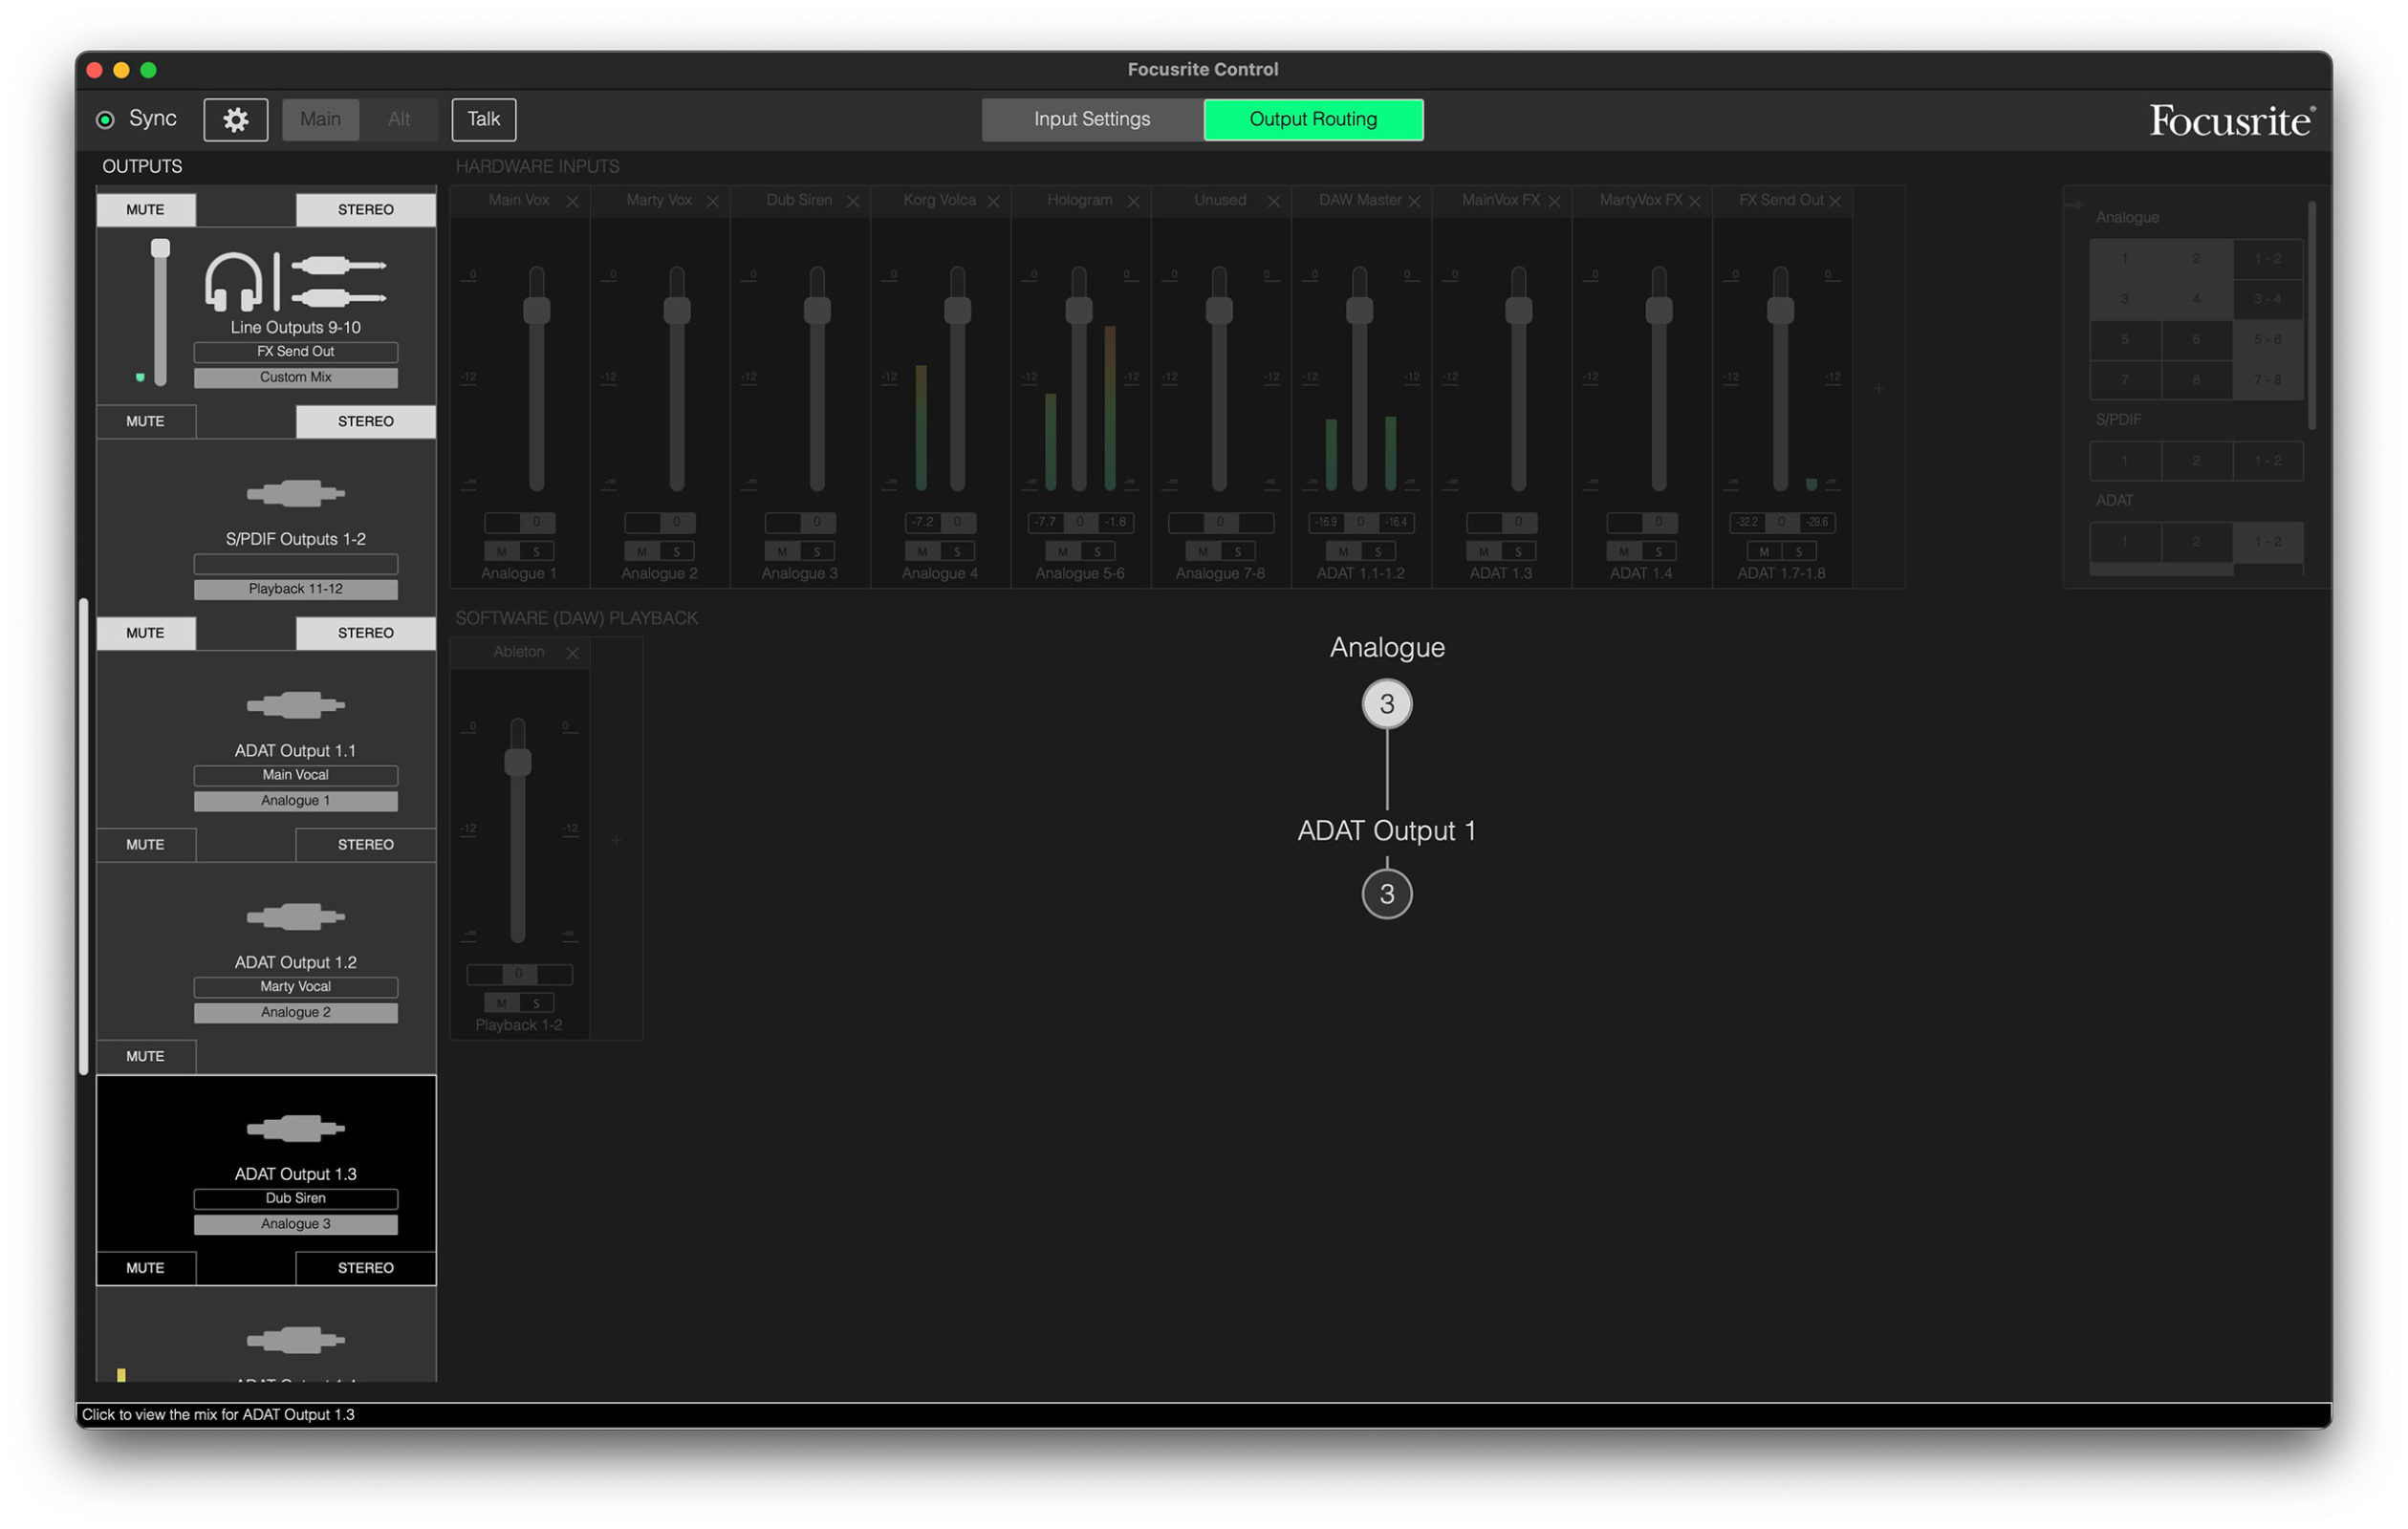
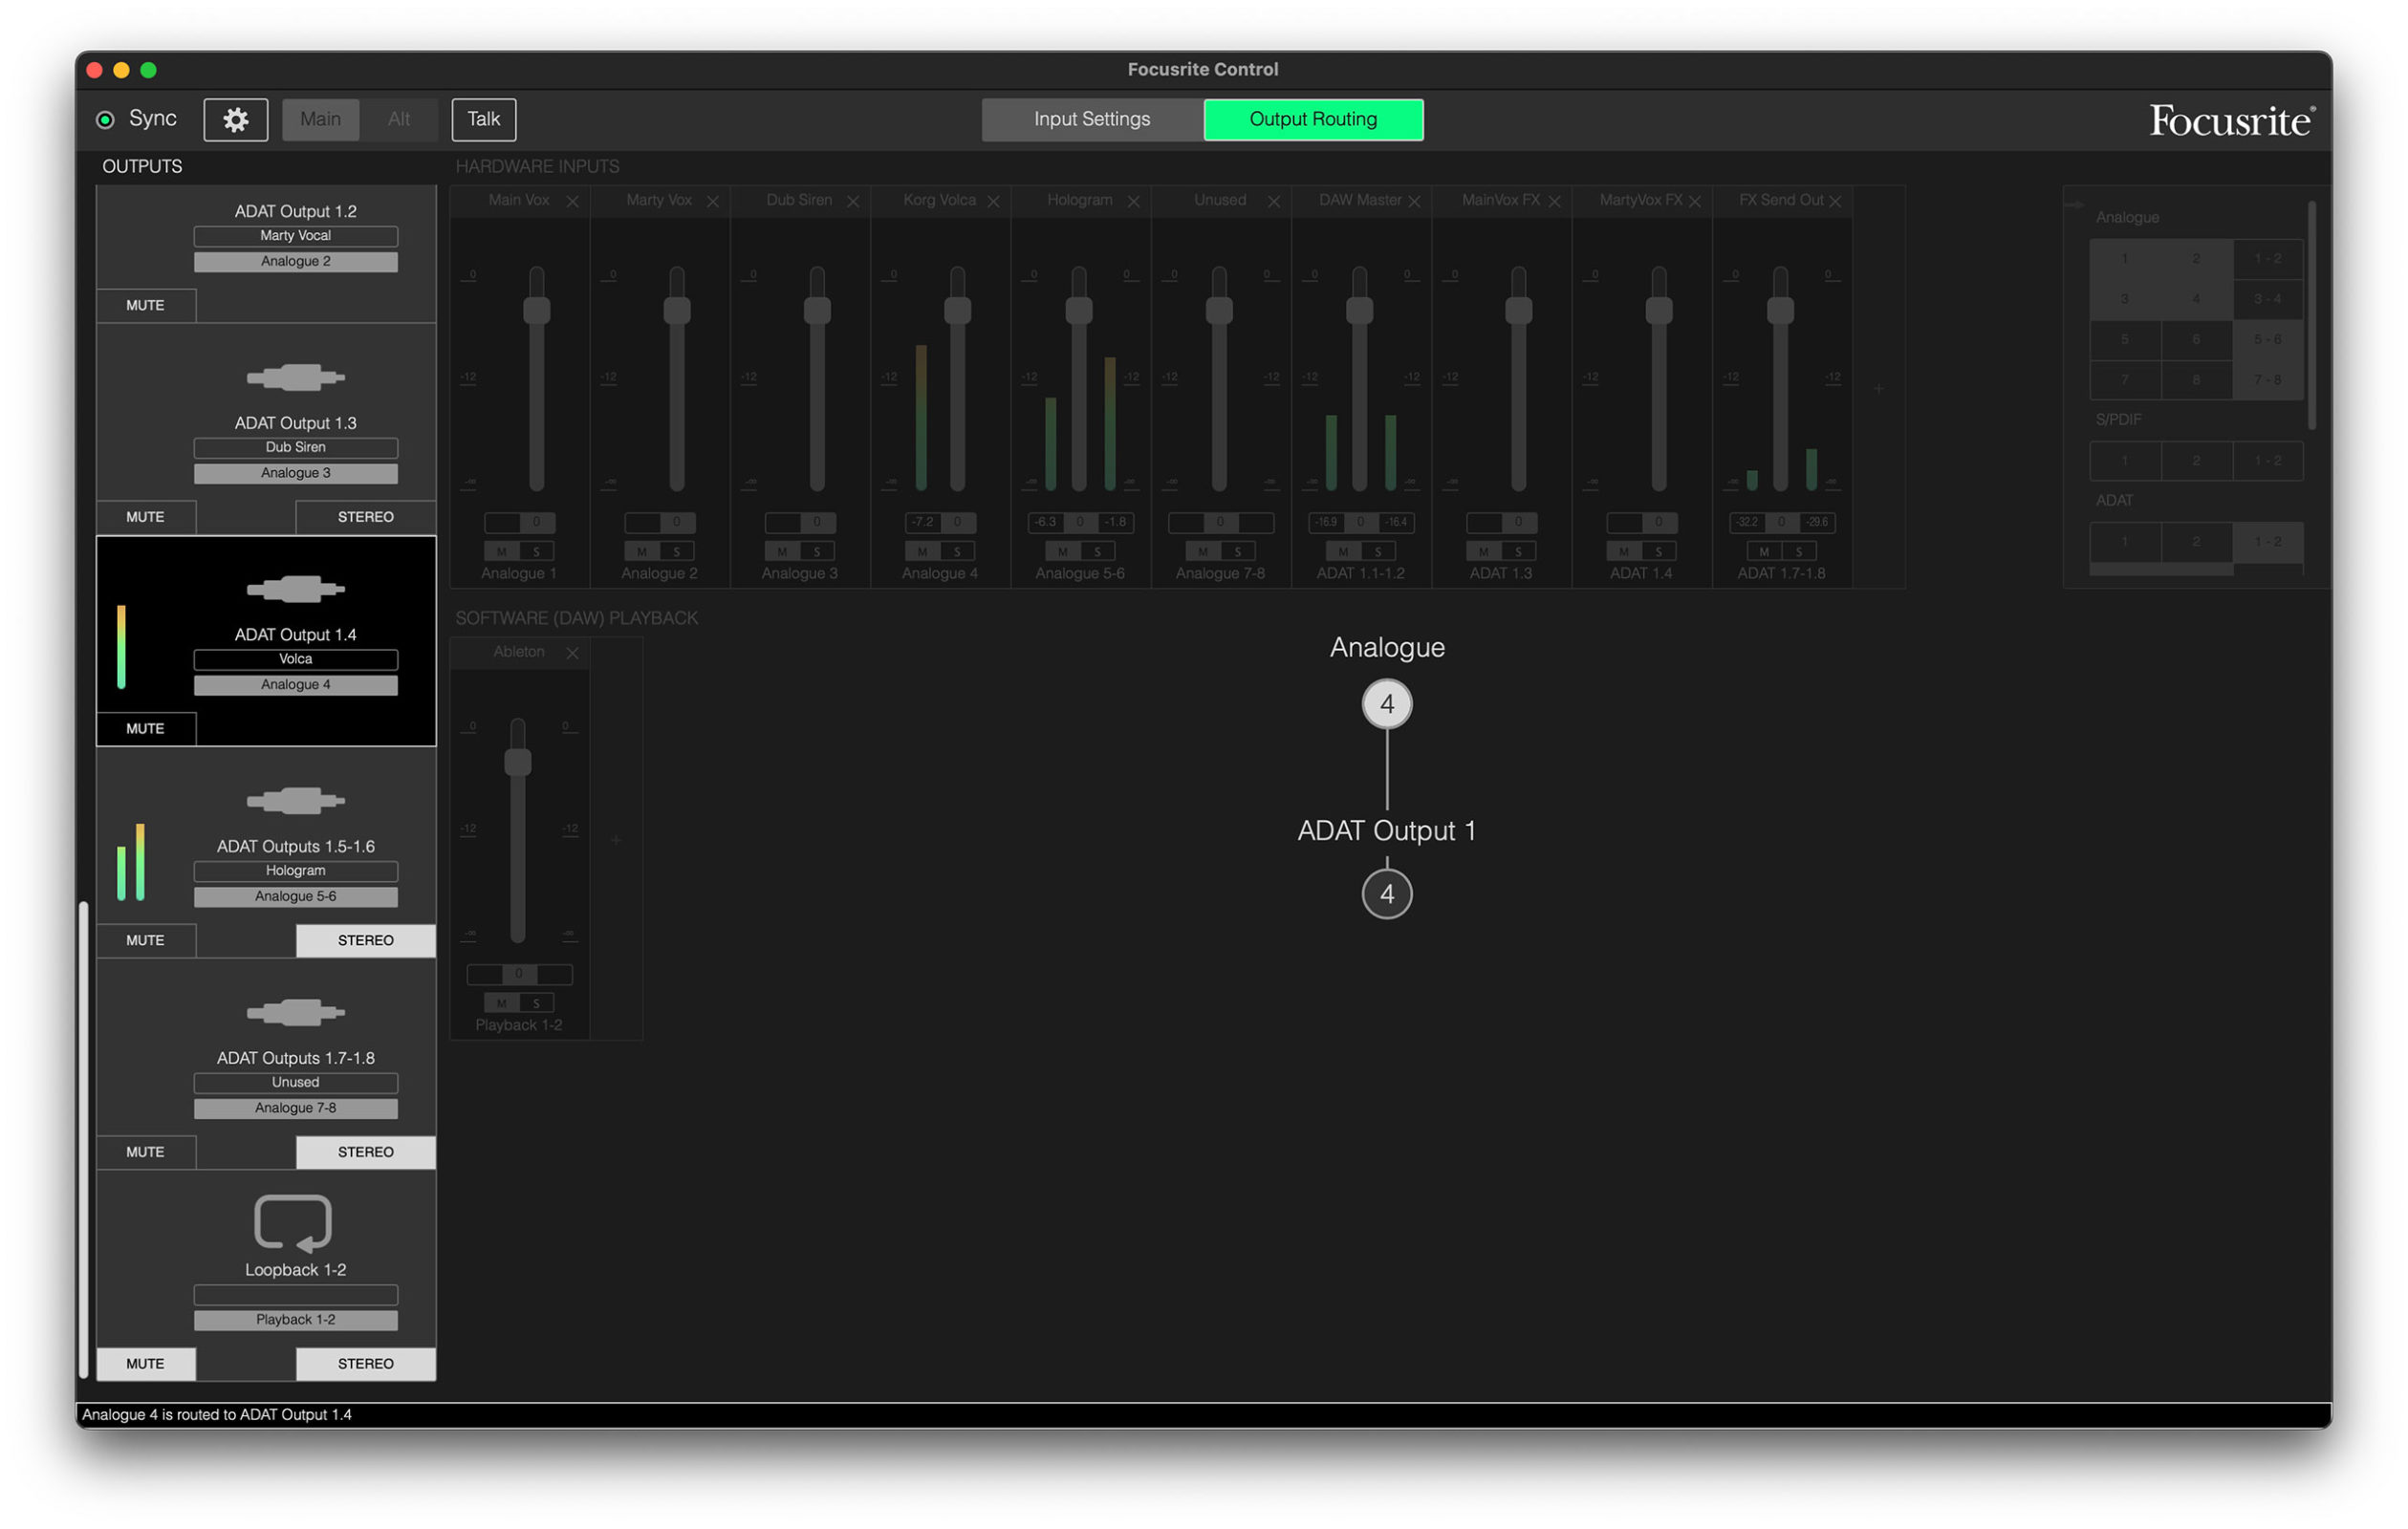
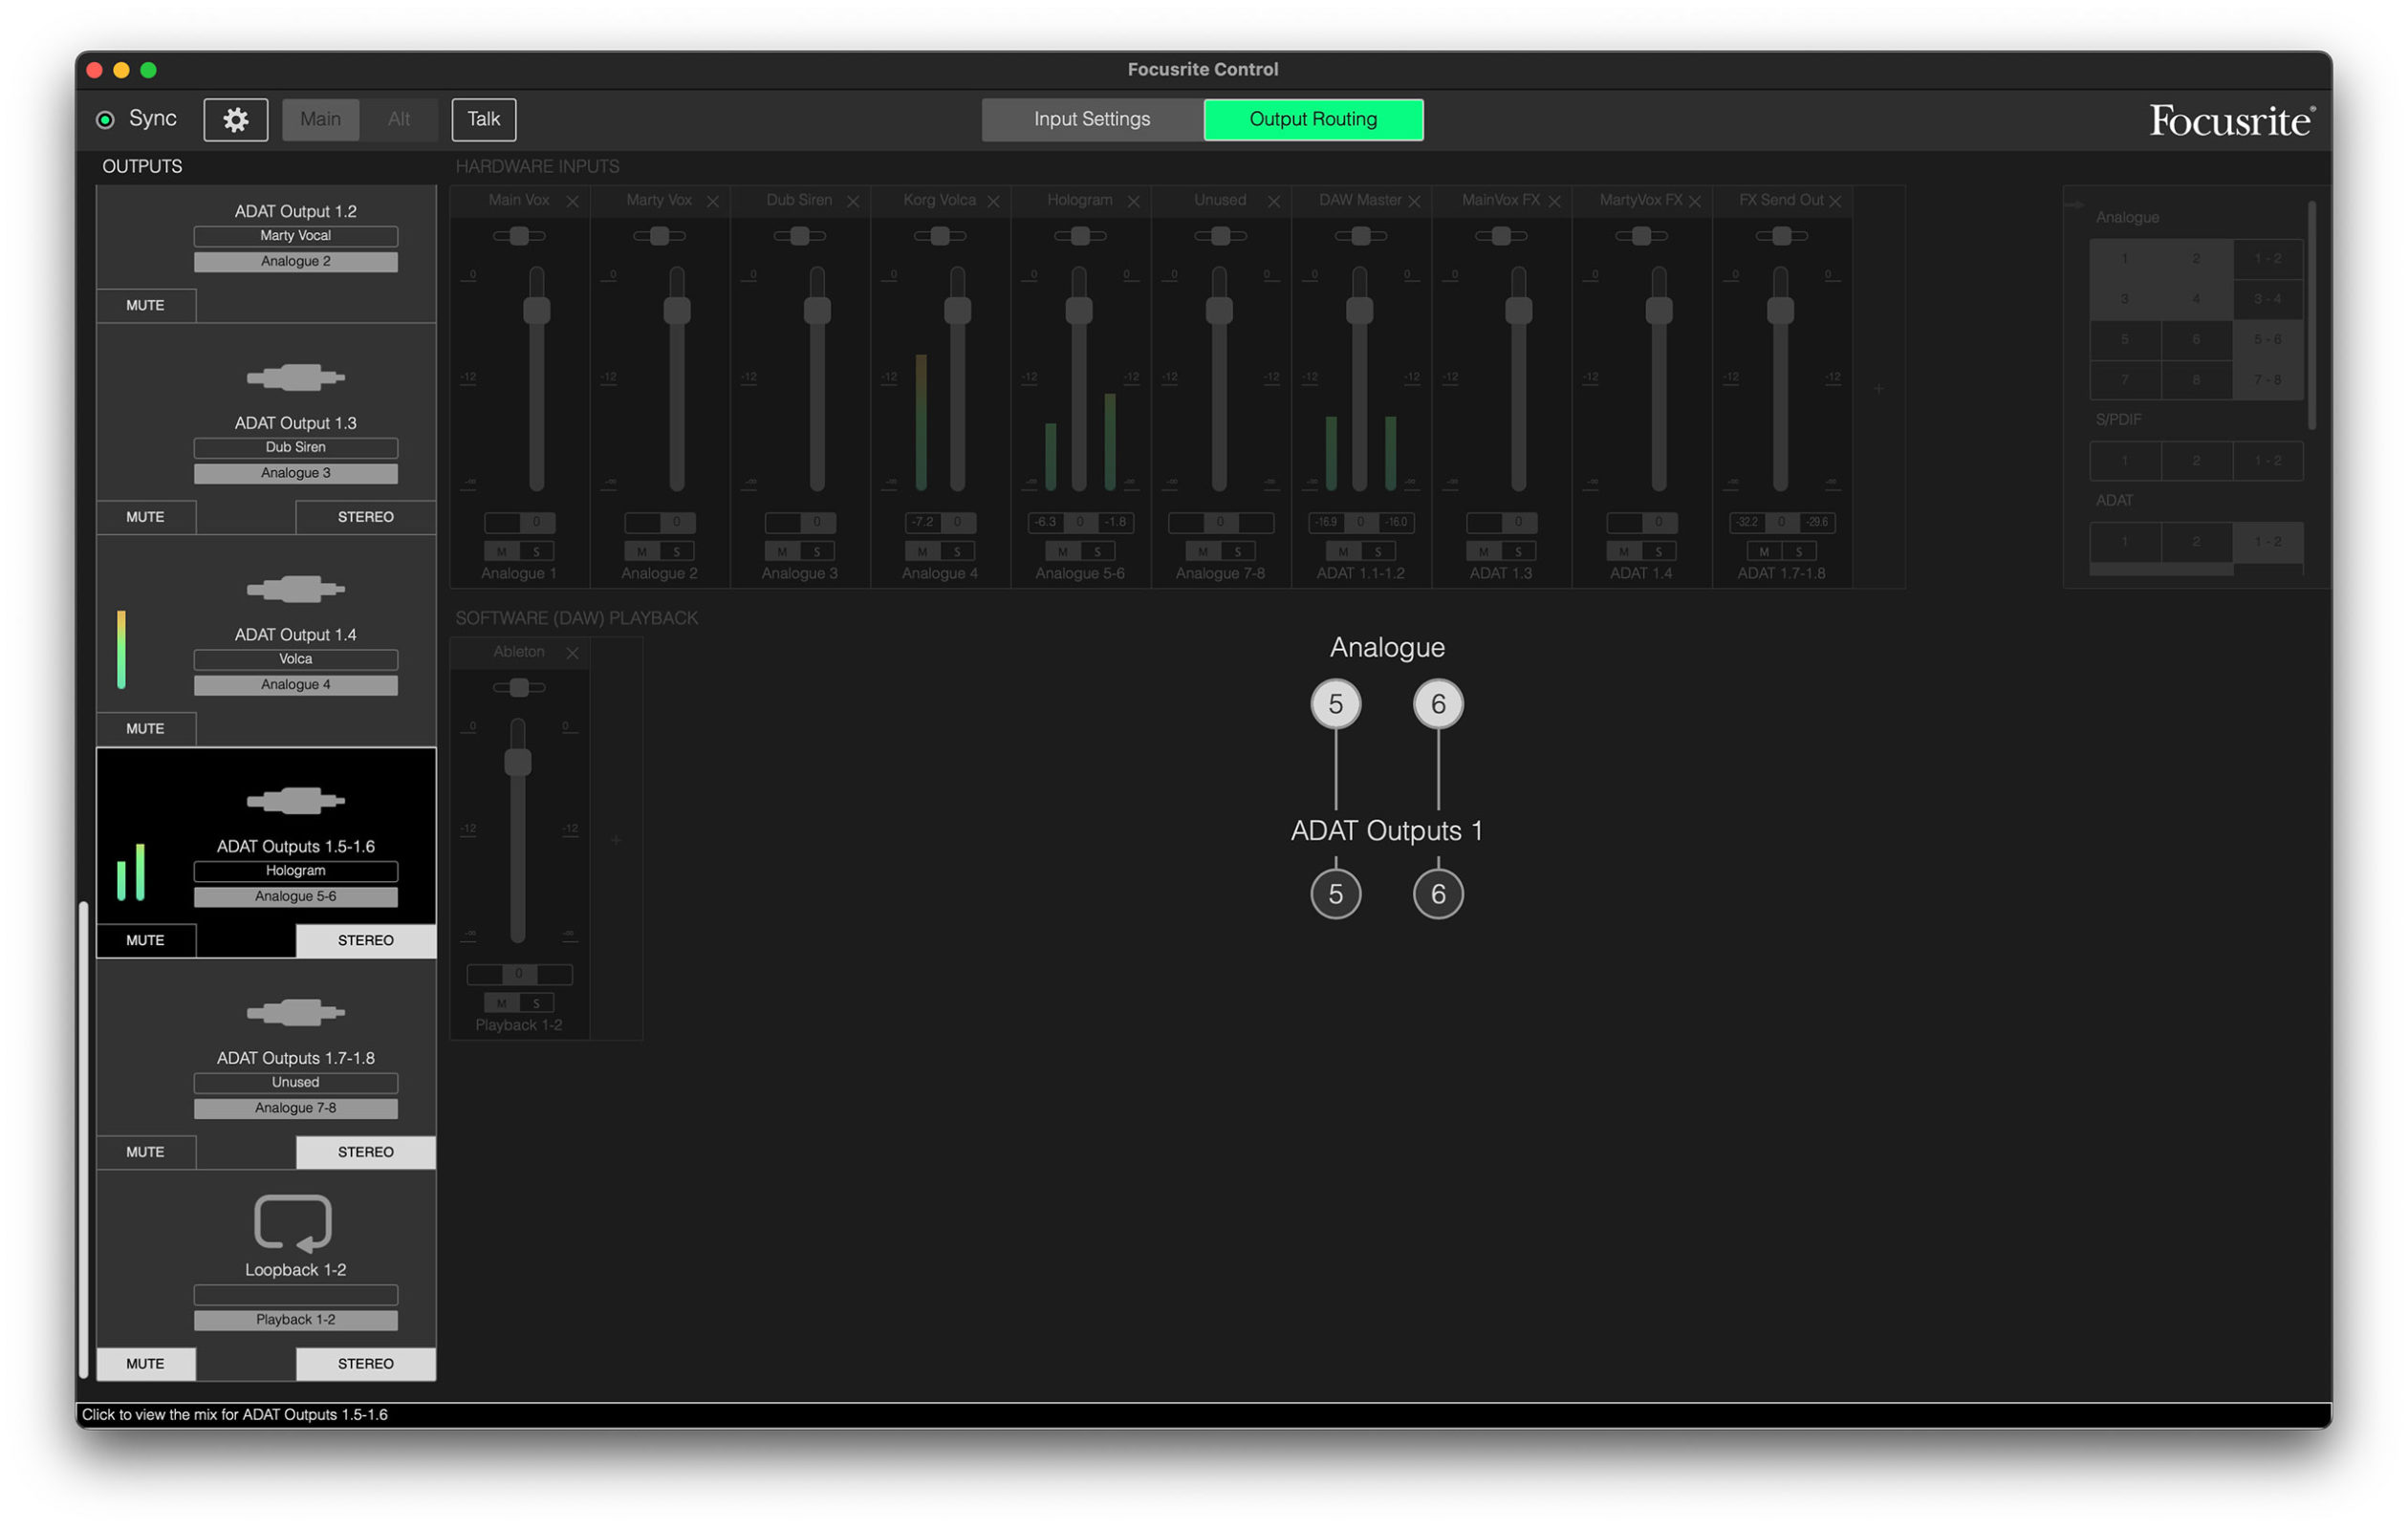
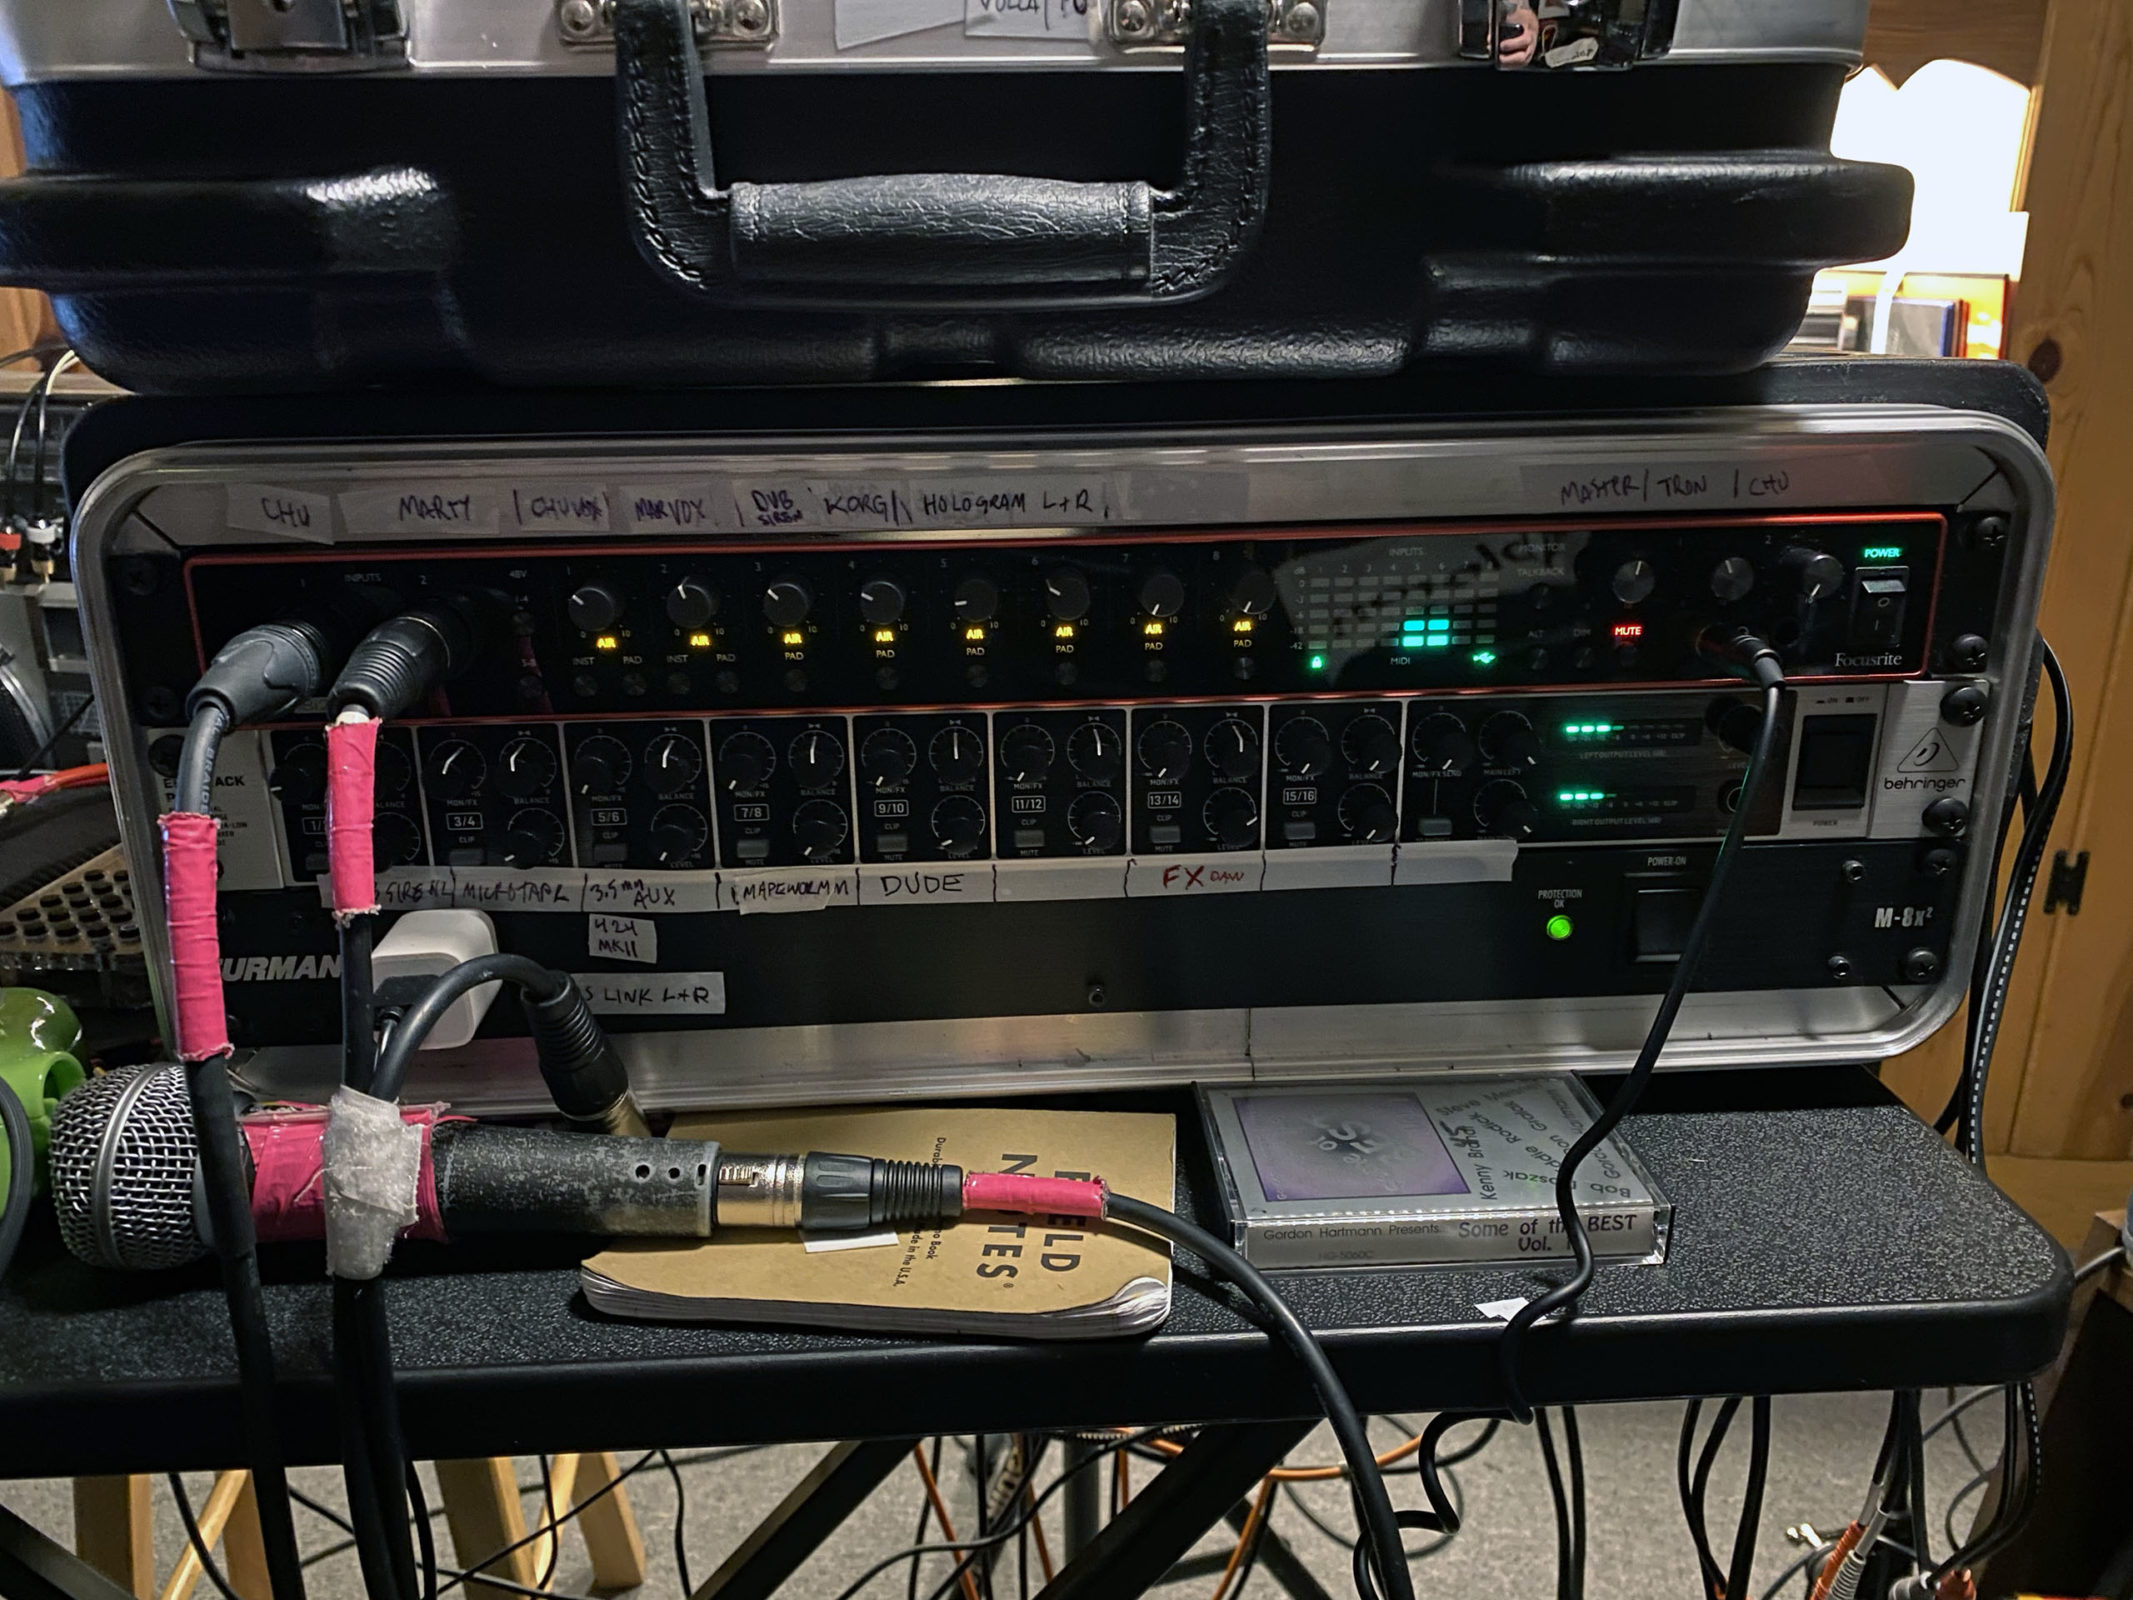
Routing within Focusrite Control
We need to ensure that the Analog Inputs are routed to the ADAT Outputs in a 1-to-1 manner. For example, Input 1 should be routed to ADAT Out 1, Input 2 to ADAT Out 2, and so on, up to Input 8. Additionally, you will also want to make sure that the ADAT Outputs are set to either MONO or STEREO depending on your needs. An Output sending to an external stereo FX pedal might require a STEREO signal, while a single channel of vocals may only need a MONO output.
Routing a Software instrument to Push’s ADAT Output
It is worth noting that it is possible to route the audio of a track containing a software instrument to Push’s ADAT Outputs. To do this, follow these steps:
1. Select the MIDI track that contains the software instrument.
2. Press the MIX button on Push to reveal the Input/Output page of the selected track.
3. On the Input/Output page, you can select which ADAT Out to send the audio signal to.
Once you have routed the audio signal to the desired ADAT Out on Push, you may also need to configure the Scarlett 18i20 via Focusrite Control to monitor the signal on the speakers connected to the interface.
Using Return tracks to separate mixes
In my use case, I need to create separate mixes for MONO Main Vocal Out, MONO Backup Vocal Out, STEREO DAW (without vocals) OUT and a STEREO headphone mix with EQ OUT. To make sure my vocals do not show up in my DAW signal, set each vocal track to “Sends Only” then send each to their own return track, and each return track set to “Ext Out” to the desired MONO Line Output. For the STEREO DAW out, create a new return track, and for it’s input select “Master” and for it’s output select “Ext Out” and route to desired STEREO output pair. You can then give these four outputs to a club venue to mix back together for front of house and custom stage monitor mixes.
My Focusrite Control Settings
To help visualize, I made screenshots of my Focusrite Output settings. It’s worth noting that SPDIF outputs 1/2 will not be used.
Click thumbnail images to view larger.
My Focusrite Control snapshot
To help demonstrate, and also have my own backup, you can download my Focusrite Control snapshot and load it into your interface as a starting point.
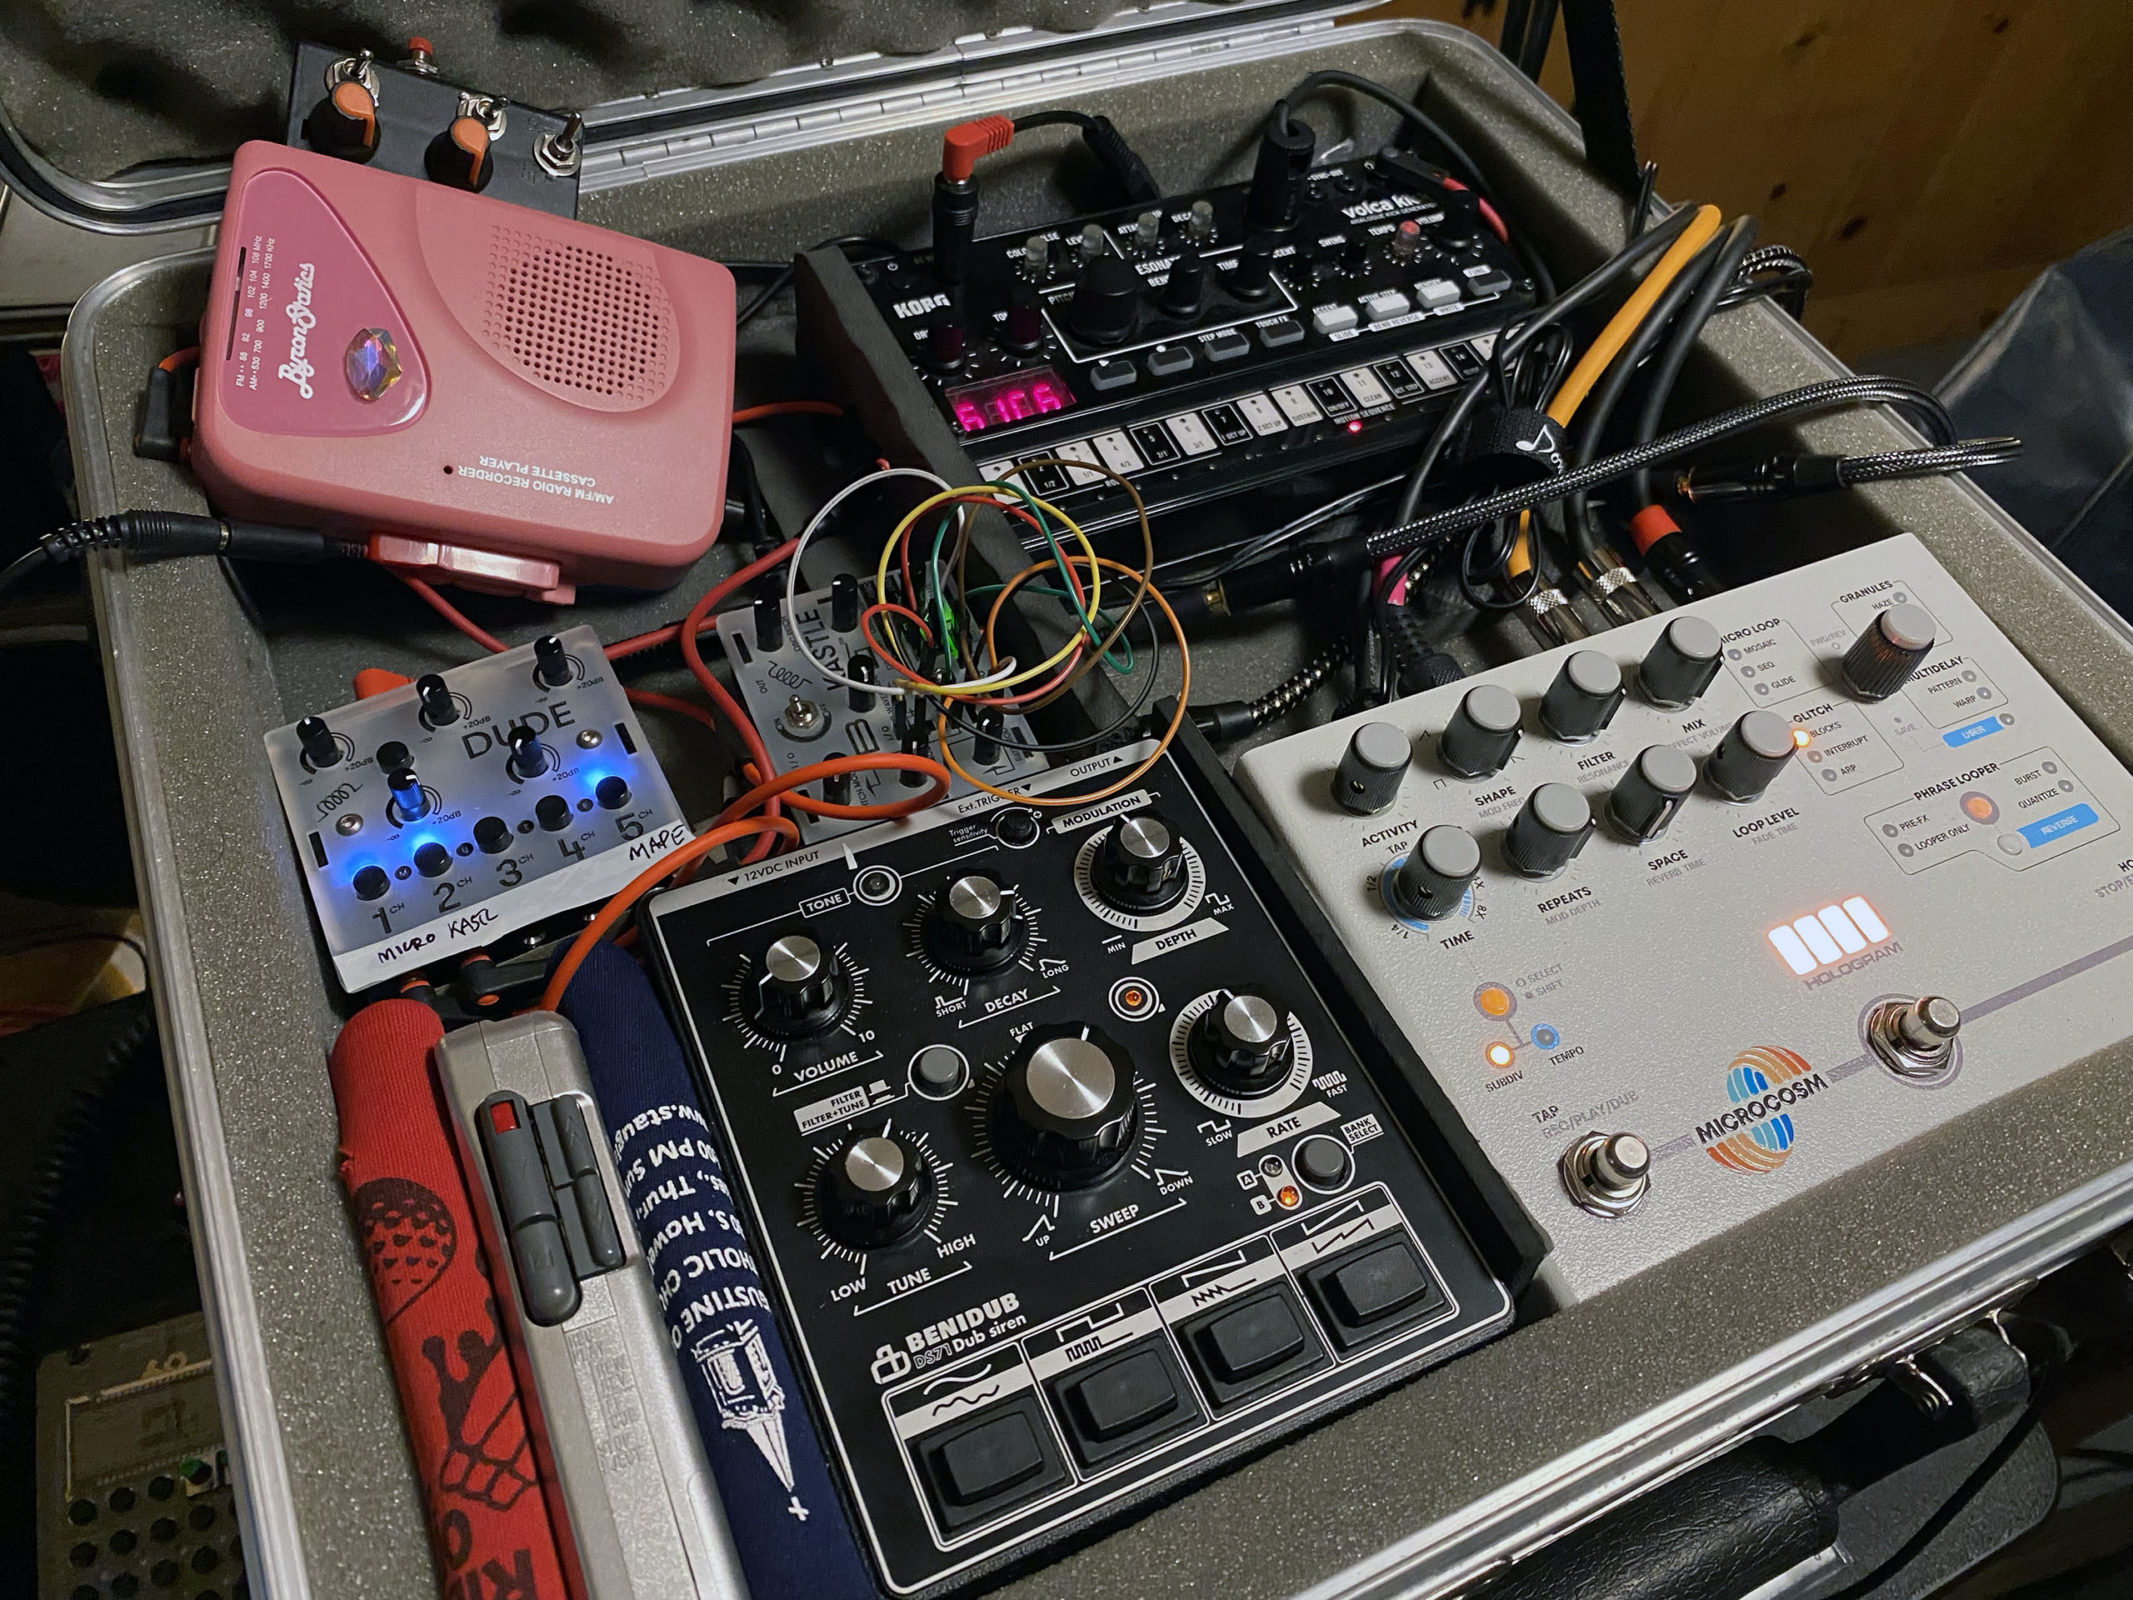
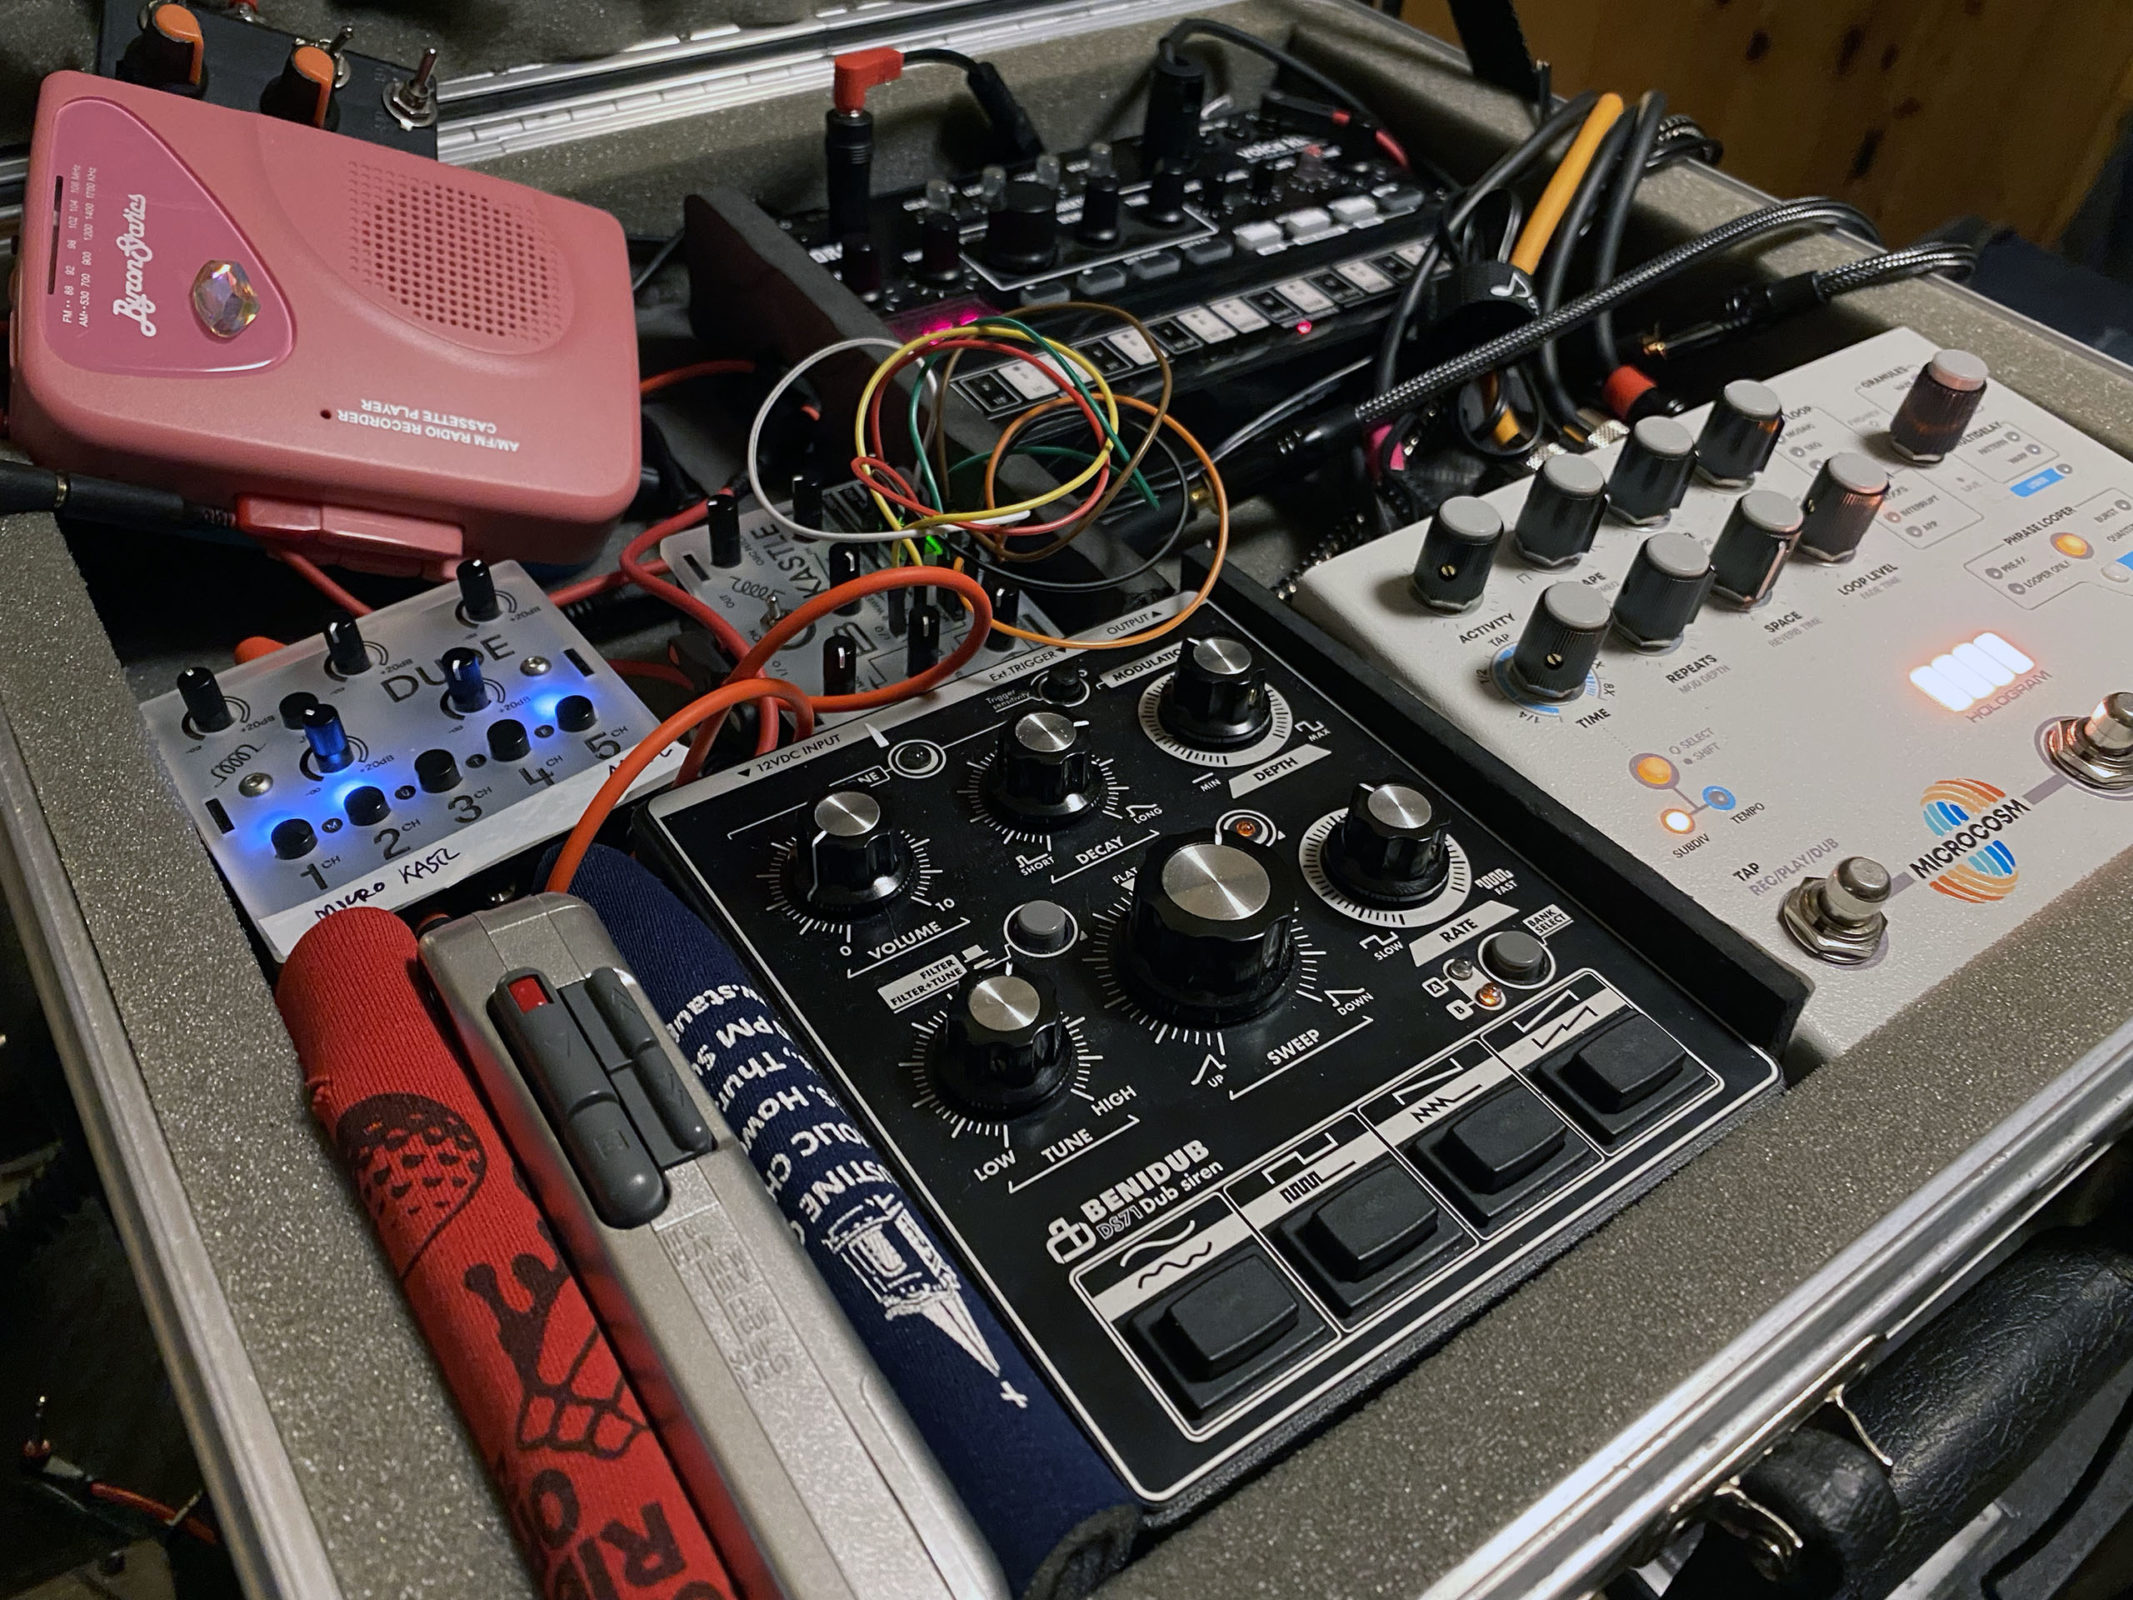
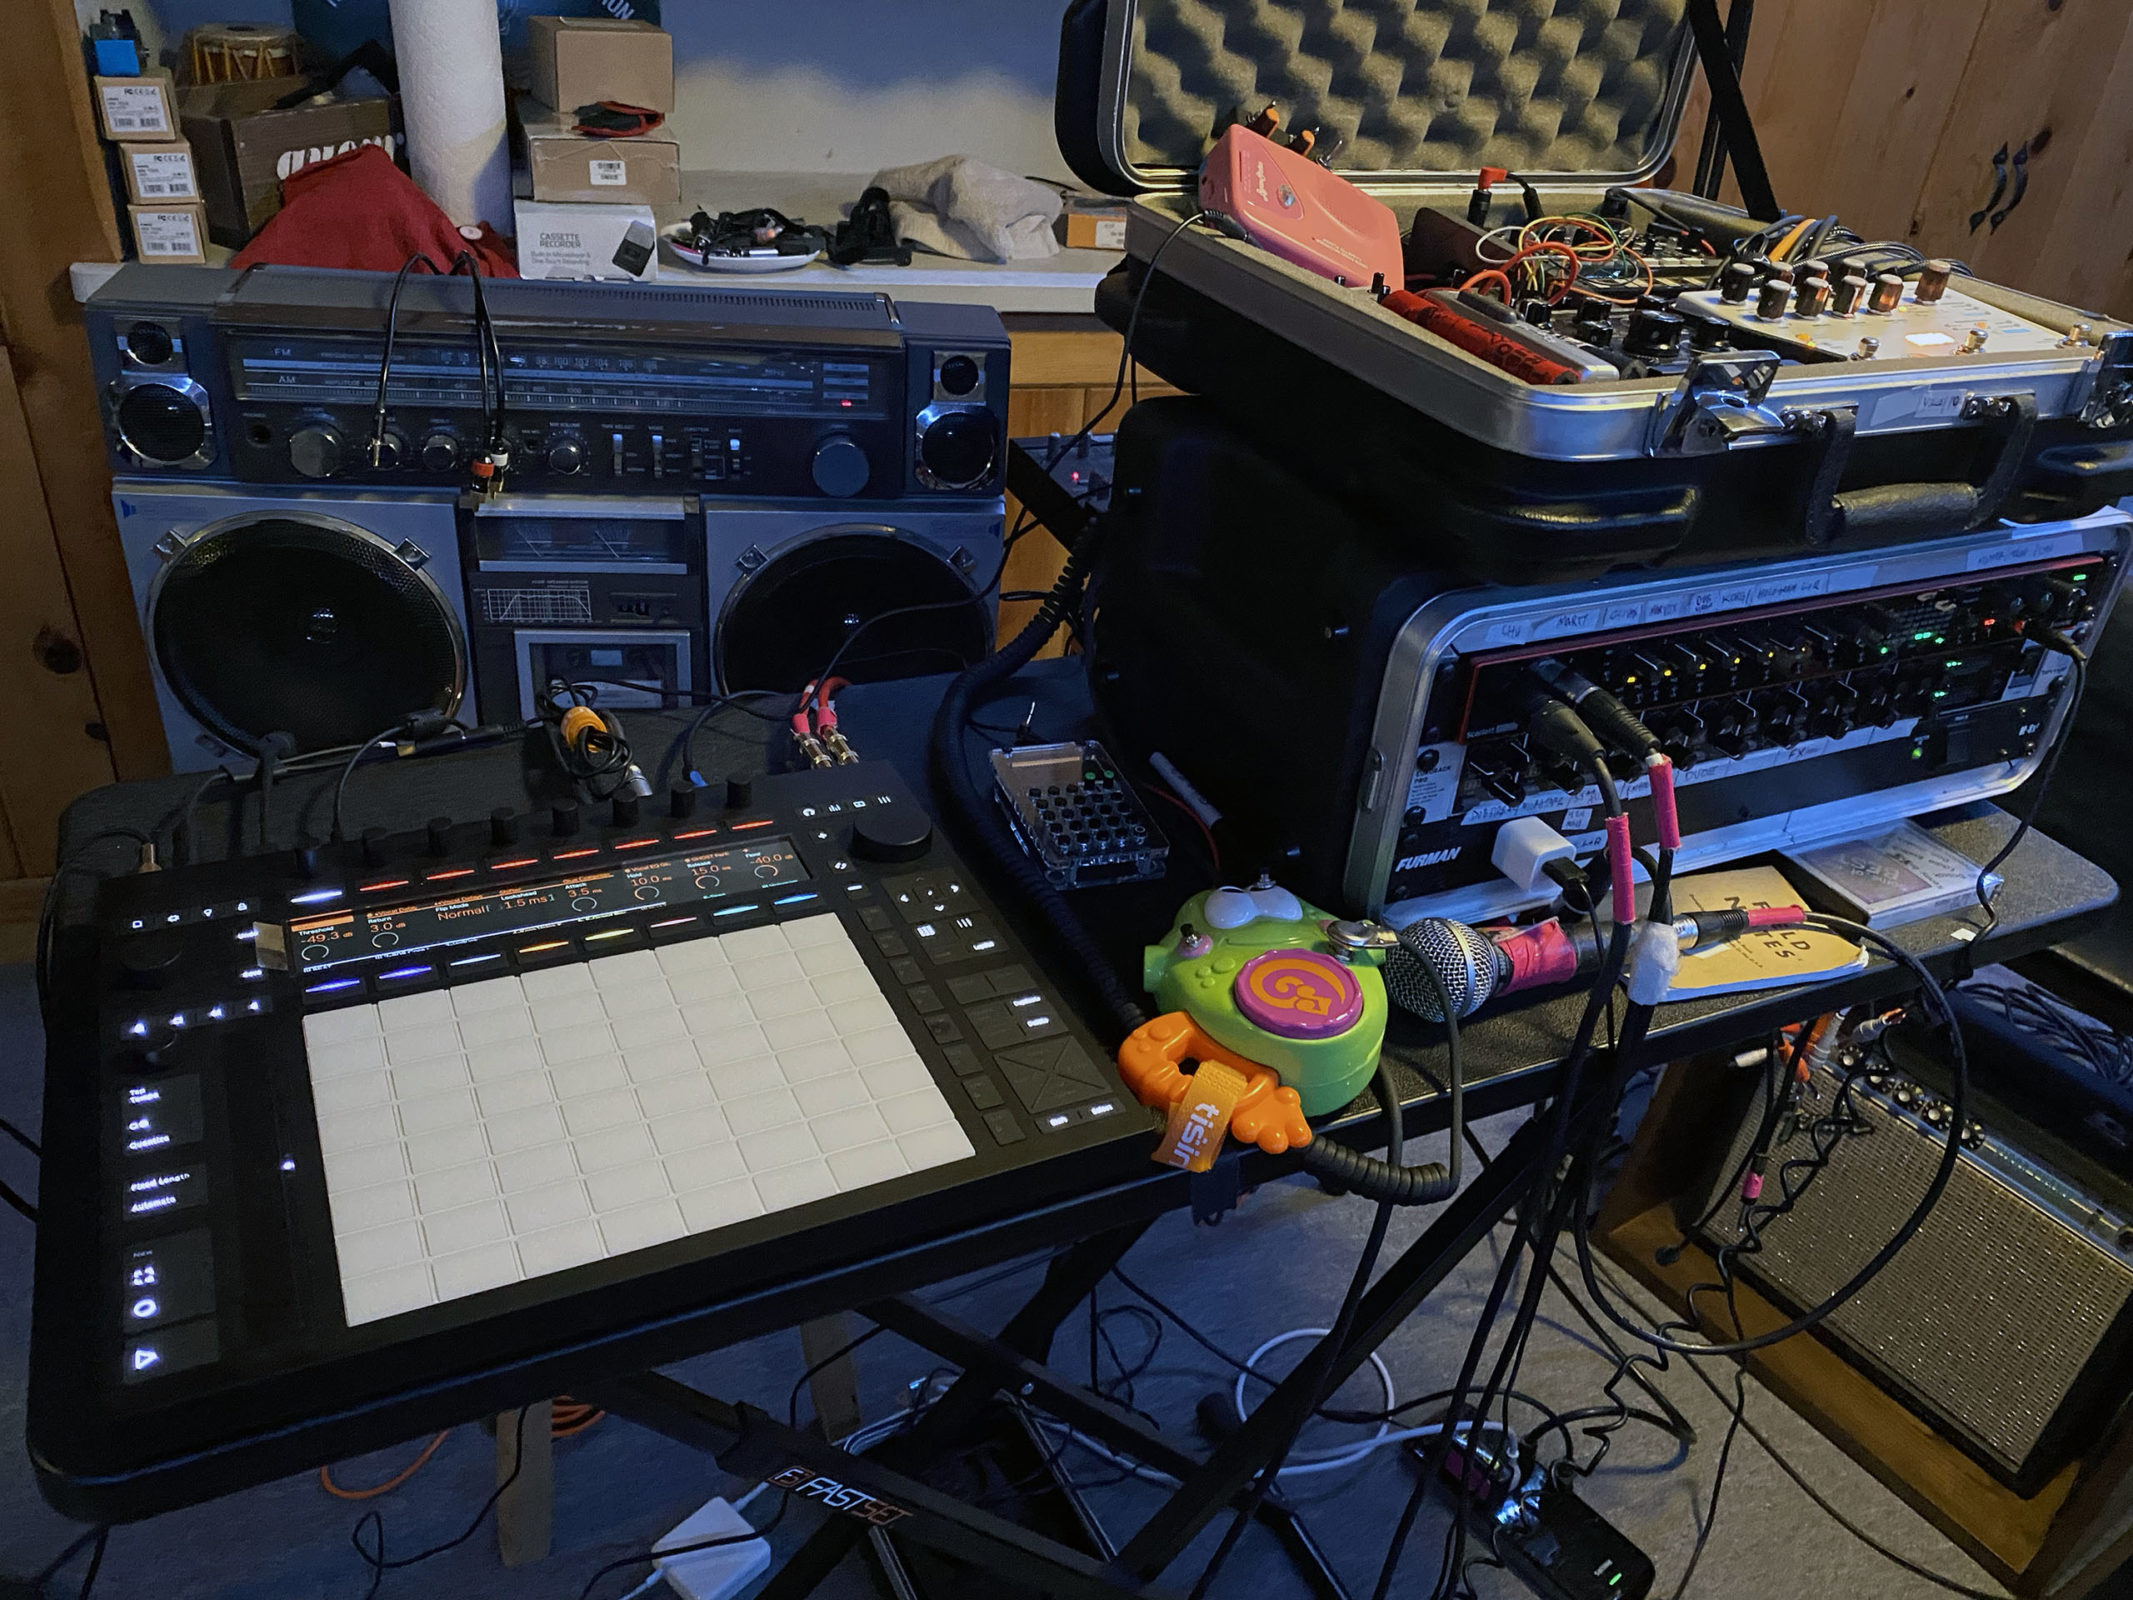
My live rig has evolved over the years, first it was a guitar, Push 2, an old Mackie 1202 and a laptop. Then I eventually ditched the guitar, got a newer Mackie mixer… and as I got into tape loops I started integrating tape players and finally picked up a dub siren. Over the last two years, I built a wild dub rig with a Tascam 414 4-track and a bunch of circuit bent toys. I’ve finally slimmed it down for my new live setup, to accommodate Guerrilla Ghost, solo Tron Jovi, and my new, unnamed synth pop live sets.
My Ableton Live Set
In case you might find it helpful, here's my Ableton Live set demo with my routing applied. You'll need Ableton Live Suite 11.3.11 to open the file. I've substituted a basic 808 drum kit and operator synth, so you'll need those instruments.


There are no comments yet, add one below.